Curious about how I stumbled on this mod? See this post.
Inspired by Murray, and very much against my own strict rule of no food or drink in the car, I went ahead and decided to see how this mod would work for me. (Note - so now water only ok...maybe...?)
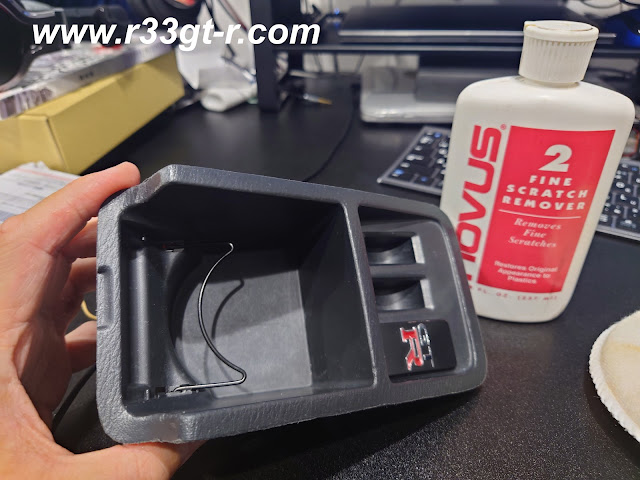
Yahoo Auction to the rescue. The seller sent me the GTST center console, all nicely wrapped up. Note that this part is apparently no longer offered new - plus I knew that some work would be required to make it fit properly and thus being an experiment, I preferred working with a used piece anyway.
But talk about DISGUSTING...(shocking for Japan!)
So after thoroughly cleaning AND disinfecting the relevant part, I tried to see if it would fit as is:
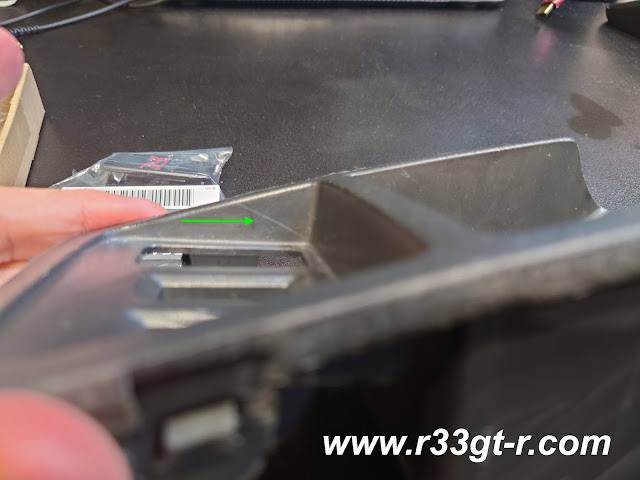
Green arrows show where, despite firm pushing and pressure, the piece did not fit snugly
But unfortunately, given the extra thickness of the drop in location due to the awesome leather work by my friend Cesar about 5 years ago (already!), some judicious sanding down was required.
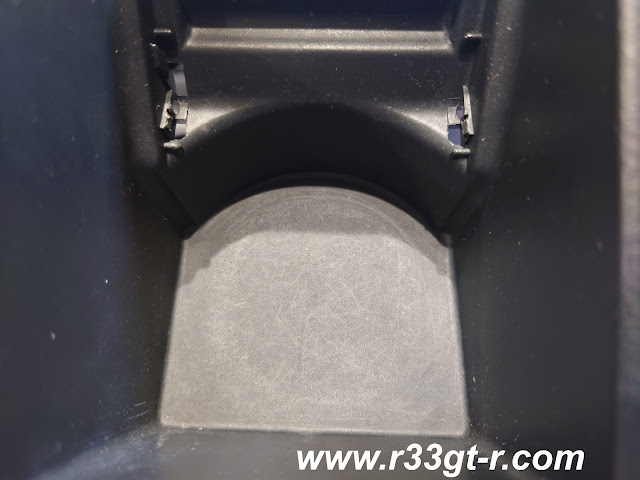
But getting it to fit properly was only one concern - is it me or do you see wear and tear and small scratches?
No? Well here is a close-up. Note the circular patterns from obvious use.
Oh and here is a scratch I found on the side as well. Wonder how this happened?
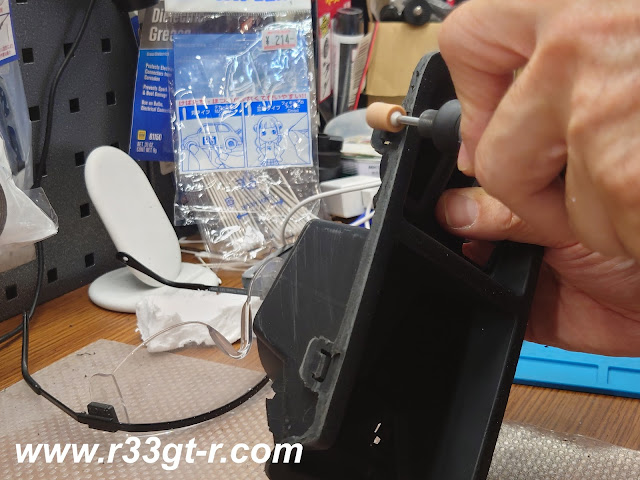
For you guys who need to look for this piece for your own mod - here is the part number, although you may just want to pick up the entire center console - just remember that this cupholder part will NOT work unless you have swapped out the OEM G-sensor for the new, flatter digital ones available from Do-Luck and other tuners:
Green arrows points to the part number WITH the hole for the GT-R logo
The scratch remover ended up removing more dirt than scratches:
So after another attempt to lessen the scratches, I decided that the quickest and easiest way to lessen the presence of the wear and tear and scratches was to use up the remaining matte black paint I had that I had used on the dashboard surround refresh I did a few months ago.
Before painting
So it looks somewhat thickly laid on here but just the lighting.
As you can see I still kept the fake leather grooves:
Here is a comparison of how it looks the next day after drying, along with the other versions I currently have - wrapped in Alcantara or matte carbon-ized (both from the leather interior project)
I thought I was finished - looks pretty good close-up, right? - but then noticed this. Wear and tear on my car's original GT-R logo.
I tried to use a permanent ink marker to try to touch up the left side of the logo piece
But in the end it was easier to just replace it with new.
New vs. Old. Part number included just in case
So not as perfect as I want - the paint job could have been better, actually - but now the coloring matches the shift surround and the main cluster surround. Plus the new GT-R logo is nice. Details, man!
All done! Still not perfect but good enough fit and finish for now
But the REAL issue is - since no one uses coins anymore at toll gates - it's all electronic now - do you think I should modify those coin holders to the left of the GT-R badge? If so what kind of switches should go there - putting aside the inevitable ejection seat jokes - what do modern cars have in the center console? I need some inspiration! Thanks for reading everyone, looking forward to the feedback.
So I had a few minutes today to take the car out for a spin. Unfortunately, most of it was in stop-and-go traffic, so I was unable to fully explore what the DTM-II could do. I plan to take the car out for a spin in the mountains or track soon, after which I promise to provide a full report on the driving experience.
However, I was able to shift between the various settings, G-1, G-2, G-3 and A-1, A-2... and yes there IS a difference, EVEN in city traffic. There is a marked delay in how quickly the ATTESA sends torque to the front wheels, for the G settings versus the aggressive A settings. Even amongst the G settings, I noticed that G-2 (Tarzan G-box) appeared to react the quickest. However, it was in A mode where I saw the front torque gauge meter needle shoot up to the max of 50kg...in the other modes I saw the needle go up to 10kg consistently, which Ito-san had told me is about 30% power to the front.
Now, an addendum to my previous posts and the instructions. While driving I realized that, perhaps hiding this device in the center console may be a waste for those of us who like to have interesting info displayed. In fact, I am almost tempted to put this up on the right corner of my dash, next to the heads up display (I needed something to read speed above 180kph as I didn't want to change the speedometer). This is because the device displays peak G forces, front, left, right and rear (and the right side of the two vertical bar chart), AND, on the left side of the two vertical bar chart, the real-time longitudinal Gs (as indicated by the "V") and side Gs (as indicated by the "H"):
Very entertaining to see what kind of Gs you can generate while driving...
So my next task is 1) to take the car on a fast drive, and 2) to play around with the driver programmable settings. Apologies for the relative lack of information in this post, but schedule permitting I hope to be able to at least do one track day before year's end.
Once installed, the first thing you will need to do is ensure the DTM-II unit "learns" the voltage outputs for closed and open throttle positions on your particular car.
Here is a video clip where Ito-san and I demonstrate how this is done.
This shows that in my car, the voltage ranged from 0.4V at close to 4.1V at full open throttle. This is consistent with what's to be expected, as shown here:
Ok so now we're ready to roll... except you'll need to figure out which setting you want!
There are 7 settings for the DTM II: 4 in "G" mode (displayed as G1, G2, G3, and G4), and 3 in "ARX" mode (displayed as A1, A2, and A3).
Here is a video I shot (at night, sorry it's blurry - the actual device is super crisp and clear) that shows how to switch between the various settings.
Before I describe each of these settings, we first need to review what the DTM II device is doing. Recall that the ATTESA ECU bases its decision making on various inputs, 3 of which are, the car's longitudinal and lateral G forces (from the onboard G-sensor), and throttle position.
Here is a diagram showing the ATTESA map in 3D, showing just how G forces affect ATTESA output. The right axis is lateral acceleration, the left axis is longitudinal acceleration, and the vertical is amount of power going to front wheels.
Taken from the 1997 R33 GT-R catalog
The impetus of Do-Luck to develop its original Digital G-sensor was that due to age, the OEM G-sensors, which are analog devices (basically a pendulum in oil), were degrading to the point where the signals being sent to the ATTESA computer were inconsistent, slow, weak or non-existent, thus preventing the ATTESA from performing as it should. And an OEM replacement cost somewhere around 130,000 yen and were still analog. Digital G sensors are now commonplace (most smartphones have them), are inexpensive, ultra accurate, and fast. So it was only natural that the Digital G-sensor was developed.
Both this Digital G-sensor and the Tarzan G-Box, however, do not simply send back the actual raw G force data to the ATTESA ECU. Both devices actually modify the signal being sent by multiplying the actual raw G reading by a pre-set variable (or set of variables, in the case of the Tarzan G-Box), which, as can be seen from the map above, means that the ATTESA is engaging faster than before because it believes that the car is experiencing higher Gs than it really is. As an example, if the car is actually experiencing an acceleration of 0.3Gs, but the Digital G-Sensor multiplies that number by a pre-set number, say 1.5, so the ATTESA thinks the car is accelerating at 0.3x1.5=0.45Gs.
In "G" mode, the DTM II is acting as a standalone G-sensor. Specifically, in G1 mode, the DTM-II unit is outputting the same modified G signals as the Do-Luck Digital G-Sensor; in G2 mode, the unit is outputting the same modified G signals as the Tarzan G-BOX; however in G3 mode, the unit is outputting what the OEM unit would have put out when new (i.e., a "pure" unadulterated G signal).
G4 mode is user programmable - that is, the user can choose by what percentage each of the 4 (front, rear, left, right) G forces should be multiplied by, as sent to the ATTESA ECU. The user can choose an amplification between 0% to 200% for front, left and right G forces, but for the rear G force (i.e. braking), the amplification range is between 100% and 115%.
Here is a video where I demonstrate the G4 mode:
So what is ARX mode? Remember with the G mode settings, the raw G-force signal was amplified by a set variable. In ARX mode, the throttle position comes into play along with the G-forces (however there must still be enough G-forces first, as throttle position alone won't activate ATTESA). Further, unlike in the G modes where the raw G-force signal is essentially only "multiplied" by a set variable, in the ARX modes both the throttle signals and G-force signals are outputted according to a unique "map" (still based on the original ATTESA ECU map). Ito-san explained that, rather than a linear output (where all the incoming data is mutliplied by the same variable), in ARX mode each data point is specifically associated with a specifically amplified (or de-amplified) data point which is then sent to the ATTESA ECU.
Ito-san calls A1 mode the "street" mode, and the A2 mode the "circuit" mode. A3 mode is again a "pure" signal mode for both G forces and throttle position.
Speaking of throttle position, the user can also adjust the throttle position signal being sent to the ATTESA unit, as I show in this next video clip.
Note that I was getting tired and lost my train of thought at about the 2 minute mark, and mistakenly said that at 100%, I would get the "maximum of the ATTESA working to pull me out of the curve." Note this is only true if there are G forces in play as well, as noted earlier.
Also during the video at around the 3 minute mark, I referred to the Optional Map Edit, which refers to one of the two leads which the DTM II has. Originally, the OPT lead (as shown below) was designed to hook up to the AYC in the Lancer Evolution cars (this unit works with them as well); however as I mentioned in my previous post Ito-san is working on using this to control the Active LSD found in V-Spec 33 and 34 GT-Rs.
So that's pretty much it for now. I apologize if I left anything out or was unclear.
Finally, in response to a few questions that I have already gotten:
1) No, this unit will NOT allow you to switch to a pure rear wheel drive (FR) car. Remember in 33s and 34s, there is always some power going to the front, so the only way to get around that is to essentially have a separate switch that cuts power to the ATTESA ECU. (but then you'll get warning lamps). Although I wonder what would happen if you set the front G force setting to "0" in G4 mode...(theoretically, that would mean no signal gets sent to the ATTESA unit, no? Maybe someone will tinker and find out!)
2) The difference between the DTM-II and something like the below, is that traditional ATTESA controllers only amplify the signal from the G-sensor. The DTM-II has its own G-sensor, and further allows for manipulation of the throttle signal.
3) Is it possible for the user to have another channel to self-program? No, however Ito-san has indicated that select dealers will be given the ability to change the programming found in A3 and G3 modes, giving users even more choices (e.g. a setting specific to a certain circuit?)
4) Is it possible to change the ATTESA "map"? No, because that map is onboard the ATTESA ECU. However given the ability to send different and amplified G and throttle position inputs, it is possible to use only certain sections of that base map (e.g. the most aggressive portions), or distort the map so that the ATTESA unit's lowest/highest thresholds are raised, lowered or both.
In my next blog post, I'll post my driving impressions, as well as address anything else I left out! Leave a comment or question if you have one, thanks!
In perhaps another world's first, I was given the honor of being one of the first R33 GT-Rs on the road to be fitted with the DTM II - Do-Luck's even more advanced G-sensor - now with throttle position input and being driver and tuner programmable as well. (I am certainly the first to do a full write up in English, so I hope I get this all correct!)
To review, the Do-Luck digital G-sensor devices (both the Digital G-Sensor model and the Tarzan GBOX) replace only the OEM G-sensor, located under the center console in the RB26 GT-Rs.
The Do-Luck Digital G-Sensor
The TARZAN GBOX
The DTM II adds not only 7 different settings, (1 of which is user programmable and 2 others which are programmable by select tuners; and the user also is able to modify all the maps simultaneously) but also an organic EL display unit with 5 input keys and compact enough to be mounted almost anywhere in the car. Installation is straightforward, but since a picture is worth a thousand words:
The very plain box the DTM II comes in
The contents of the box
The first step is to remove the shift knob, shift knob surround, and ashtray, and then undo the screws holding in the center console, in order to access the G-sensor installation location. In my case, in my effort to keep my car looking as stock as possible, I chose to install the EL display unit inside the console box (and thus chose to give up the ability to be able to read the real time G readings displayed by the unit).
Fits very well indeed.
Of course this means having to drill a hole for the wiring...
Once the console box is removed, step back and review the scene: In my case, as I had previously installed Do-Luck's Digital G-Sensor, the gold OEM analog box was no longer there.
The Red Arrow on the Digital G Sensor shows the direction it should be installed
A closer look
Remove the old G-sensor. With my car, installation was easier than usual because I had already removed the OEM G sensor. (click on this link for my blog post showing how to).
Removing the Digital G-Sensor
And here is how the DTM II looks, installed
So slightly larger than the Digital G Sensor
The next step is to wire in the throttle position sensor leads. The instruction manual simply said to "splice in" but when I asked Ito-san about this, he clarified that you cut a particular wire coming out of the ECU loom, and then one wire from the DTM II is connected to one cut side, and the other wire to the other cut side.
Found on gtr.co.uk...Refer to the Instructions... they will say "Throttle Output Signal" which is Pin 56 ( I think this is common to the BNR32, BCNR33, and BNR34, but please verify).
Once that's done, all you have to do is thread the lead under the carpet so it ends up under the main unit.
So this lead connects to the DTM II main box...
Like so.
Wait? What's this? Two EXTRA leads?
That's right. Two outputs. There are three input/output leads, one of which connects to the lead coming from the throttle position. The others are labelled "OPT" and "LOG." The "OPT" one, Ito-san tells me, will soon allow control of the A-LSD (active LSD) found in the V-Spec models (he's working on how it can be done). The "LOG" lead is for those who like to datalog what is going on in the car. The unit produces variable voltage according to the front/back and left/right G-forces, and so if you can record that, then you can log this data.
Install finished! Quite easy. No messing around with anything that will get your hands dirty (i.e. perfect for me). In my next posts, I will go into HOW the DTM II works, how it can be programmed and other details NOT mentioned in the install manual (that I've seen) and yes, my driving impressions (in a word, AWESOME).
Tarzan Yamada drives my car at Honjo Circuit to demonstrate the difference between the standard "normal" Do-Luck digital G-sensor and his Tarzan G-Box. I won't comment on the difference the G-Box makes, except to say that it is hard to understand the difference in the braking, because that really has to be felt. But you CAN see how the car is more stable on this small circuit - although Tarzan does say that he can take the car to its limits better because he knows what the G-Box is capable of.
Anyway - if you've ever wondered what it's like to be sitting next to a pro who shows you what your car is truly capable of, let me tell you it is simply amazing! And, highly recommended... some of us (myself included) should spend more time and money improving our own driving skills, than trying to mod our cars to perfection...
And yes, I know my 3-4th gear is on its way out...
Some final thoughts about these new digital G-sensors, based on questions I have received since my first two posts:
1) The ATTESA computer is fine, and does not need to be upgraded or replaced. Ito-san told me that "even the R32 ATTESA computer was way ahead of its time. It is really a magnificent piece of work." There is a difference in the V-Spec and standard ATTESA computers (because the V-spec has the active rear LSD), but even the standard ATTESA is a superior product. And remember the ATTESA computer not only gets input from the G-sensor, but also is wired into the car's engine ECU and ABS systems.
2) According to Ito-san, the "bottleneck" is the OEM G-sensor - especially if in an older car. The digital ones promise not only digital precision and no parts to wear out, but respond 30 times faster in the R32/R33, and 15 times faster in the R34.
3) Once the OEM G-sensor has been replaced with a digital one, the next area owners should examine is the transfer. Ito-san told me that adding additional plates, torquing up the transfer, would reduce slip and get engine torque to the wheels even better.
4) As of this writing, there are 4 digital G-sensors on the market here in Japan. Both Midori Seibi and Do-Luck have their "standard" replacement digital G-sensors, designed essentially to replace aging OEM units for a fraction of the price, and provide consistent inputs to the ATTESA. This alone should bring back the ATTESA's capacity as if it were brand new. Midori Seibi has their "Midori-Spec" -an all around more aggressive version, and Do-Luck has the Tarzan G-Box. The Tarzan Box is the only one of these 4 that has been specifically "tuned" using input from a racing driver. Tarzan Yamada spent months testing the unit out in varying conditions, roads and weather.
5) Naturally, people want to know if there is no need to even consider the standard digital G-sensors. I would say that if you are almost never on the track, then this version is fine and you don't need the Midori Spec or the Tarzan G-Box. OR, if you are a purist and want to experience the GT-R as Nissan intended, the standard version is the one for you. And, before people ask, I really don't have much if any experience with the Midori-Spec unit. The description states that it gets the torque to the front wheels more aggressively than the standard version, but I would have to drive on the track with one to give any kind of honest feedback.
6) Despite his racer reputation, Tarzan Yamada wants people to know that his "tune" is designed to make the cars easier and safer to drive fast, by anyone - you don't have to be a race driver to enjoy the benefits.
7) As of this writing, the only place to purchase the Tarzan G-Box is via Do-Luck, and in Europe, through my friend Wouter's company (See first post). Ito-san tells me he is working on increasing the number of dealers worldwide who will carry the product - and hints that Sumo Power will do so soon in the UK.
As always, if you have questions I would be happy to answer them. Leave a comment!
So what exactly makes the Tarzan G Box different than the standard Do-Luck unit, as well as the units offered by Midori Seibi? Obviously, it’s the fact that racing driver and World Time Attack champion Tarzan Yamada worked for several months with Do-Luck’s Ito-san to create a device that, while replacing the stock analog G-sensor, works with the ATTESA computer to actually change the characteristic of the car in a way that Tarzan himself thinks is appropriate. So the question is, exactly how is the car different from the standard or stock set-up?
When I posed this question to Ito-san, he told me that there were several things that are different but that the most noticeable differences would be under severe braking as well as accelerating out of a curve.
First, however, I wanted to know why I wasn’t convinced of the utility of the standard Do-Luck G-sensor. I mentioned my experience at Dunlop Corner at Fuji, but also that strangely, the torque meter needle was no longer moving up and down as aggressively. Ito-san explained that the more accurate unit means the application of power to the front wheels is also more accurate and smoother. As for the needle, well it’s not necessarily accurate…hmm. Starting to make sense I guess?
Anyway, back to braking at the limit: Under severe braking, the ATTESA unit sends power to the front wheels in order to help stabilize the car. As the ATTESA ECU is wired into the ABS unit and its sensors, the more accurate and faster G-sensor allows the ABS to work to its maximum potential in conjunction with the ABS sensors. This is true for both the standard Do-Luck G Meter and the Tarzan G Box, but the Tarzan G-box gets the ABS sensors to “work faster” and hence the ABS to be applied more accurately and linear in a severe braking situation (and this is where I should have asked more questions, but basically at this point I didn’t believe him.).
Tarzan then explained it to me this way: the second generation GT-Rs have a tendency, under full braking and ABS applied, to unload the rear a bit, causing some instability. With the Tarzan G box installed, he confidently told me that under full braking, the car would be absolutely stable, with none of that tail shake wiggle that GT-Rs are known for. And not just on the track, but in the rain on the expressway for example, as well.
As for accelerating out of a curve, Ito-san and Tarzan both explained to me that you can get on the gas much quicker simply due to the more “sensitive” programming.
So what to make of this? As I had just learned the track on the standard Do-Luck G Sensor, I decided it was time to head back out and explore what the difference was for myself.
The result? When I took the car out on the track at full speed on the straight, and then braked HARD - I mean really hard, activating the ABS - I could NOT believe it, but what they said was true! So I found myself braking harder and harder, finally mindlessly stomping on the center pedal , and having the car SLOW DOWN but without any drama whatsoever - in fact it made me so confident of the car's braking capacities that I found myself being able to think about the upcoming curve, its apex, while shifting down to take it in second -but it felt like slow motion! In other words, while I might normally get flustered on a new track (even after a few warm up laps) trying to process all various sorts of information, having such incredible braking meant one less thing to worry about. Stomp away at full force, shorten your braking distance, and have enough mental breathing space to actually think about that corner!
And what about powering out of that corner? Yes, on tight corners I could still get the tail to swing out in the classic FR style, but when I wanted to clip the apex and accelerate for maximum speed, I would feel the rear slip a bit but then the ATTESA would activate to pull me out and forward REALLY quickly! So I guess it was somewhat 4WD but without the understeer? But somehow really intuitive and natural. This was the first time I had my car where I could claim this, as before the tail would slide and would require lots of steering lock to recover - here I just kept calm and pointed where I wanted to go, it seemed.
So after a few laps, completely excited and blown away, I went back to the pits to have a chat. Dino was already there (check out the stunned look of disbelief on his face, LOL), so I joined him, Tarzan and Ito-san to discuss what we had experienced. Ito-san is laughing by the way because I had just accused him of having sold me a faulty standard Do-Luck G-sensor! That's how incredibly different the two G-sensors are!
I then spoke to Tarzan himself about some of the things I had experienced driving. His response to me was, "I'll show you, let's go for a spin" - in the stock R32 GT-R that Do-Luck had brought. So off we went...
Here is video of Tarzan with Dino in the passenger seat, driving poorly on purpose to demonstrate how the Tarzan G Box makes it easy to fix a slide (well, easy for him!)
And when we were done with the white R32, I then asked Tarzan if he wouldn't mind driving MY car - first with the standard Do-Luck G sensor, and then swapping over to the Tarzan G Box. I plan to, in the near future process the video in the camcorder and show the full length video, but for now here is what I got on my iPhone, from the passenger seat!
And here are some photos - as we head out:
And then of us at speed. What you can't see are my knuckles turning white as I grab the passenger door grip handle, nor my flailing back and forth (the reason I gave up on the iPhone video).
So in conclusion: this is one mod I will definitely have to get in the future (no, I did not get a free one). It would be silly not to! Not only does it make my car easier to drive, I feel like a better driver because it makes the car so much more controllable and predictable. And while of course I have not had a chance to test it on the street, I see no reason why it would not work well there either.
Tarzan was concerned that because of his image as a racing driver, people would be afraid to buy the unit, thinking it would be more than they need. OR that it would super aggressive, for track/racing drivers only. This is absolutely not the case – while it is true that this device allows track savvy drivers to explore the limits of their car, it makes the car safer on the street, where it is unobtrusive Heck if someone like ME could feel and enjoy the difference, then this device will work for the average driver as well, on the street.
Ito-san also wanted me to let everyone know that the Tarzan G Box is fully compatible with the "ATTESA Controllers" that wire in to send more signal up front. In fact he mentioned how the controller installed in one of the ATTKD BCNR33 track cars had reached its adjustability limit, but when after installing the Tarzan G Box, was able to reduce the setting to half-way!
Please feel free to leave a comment or question, my write up has probably left some stuff out!


.jpg)


.png)

.jpg)
.jpg)
.jpg)
.jpg)
.jpg)
.jpg)
.jpg)
.jpg)
.jpg)
.jpg)


.jpg)
.jpg)
.jpg)
.jpg)


