Monday, February 13, 2012

Mini-DIY: Red Illumination Ignition Surround

Turns out, on the R33, there is a small light bulb situated in a clear plastic bracket that surrounds the ignition key. I have been told that the R34 did not have this feature. Too bad (and whatever, they got the ignition immobilizer!)

Anyway, when lit, the clear plastic extends the light all the way around.


I never did like this white color. It seemed so out of place in a car with a red themed interior. (Did Nissan forget to change this for the Series 3?) I briefly toyed with the idea of changing this to one of those red "Ignition Start" buttons, but decided that I would have to figure out a way to lock the steering wheel and provide a lock for the ignition, and so that idea was quickly rejected.

Anyway, all I had to do was pop off the steering column cover (there are about 8 screws on the bottom side), and then the illumination ring simply lifts out.

Here is how it looks, without the cover:


And here is the ring, detached:


And here is the bulb, with the stock white light.


Going with the red theme, I went ahead and replaced this bulb with a red LED.
However for some reason the LED was not as bright as the bulb, so I had to get creative and use some reflective film that my buddy Russ had given me for another project:


The end result was:


One interesting thing I noticed when doing this is, this light turns on when you unlock the doors, and turns off when you lock the doors. This proved useful in another project, which I plan to detail in my next post. Stay tuned!

Friday, February 3, 2012

How a Series 3 BCNR33 is Different From the Other R33 GT-Rs

Lately, from various people there seems to be some interest in the Series 3 R33 GT-R. For those who don’t know what a Series 3 is, the informal nomenclature refers to the 1997 and 1998 R33 GT-R models, ie the last 2 years of production. During its production, the R33 GT-R evolved, with various (mostly cosmetic) changes being made both for the 1996 model (Series 2), as well as the Series 3 models. I was going to write only about the Series 3 on this post, but decided as I was writing this that it would be best to highlight all of the changes throughout the production, to demonstrate the differences clearly.

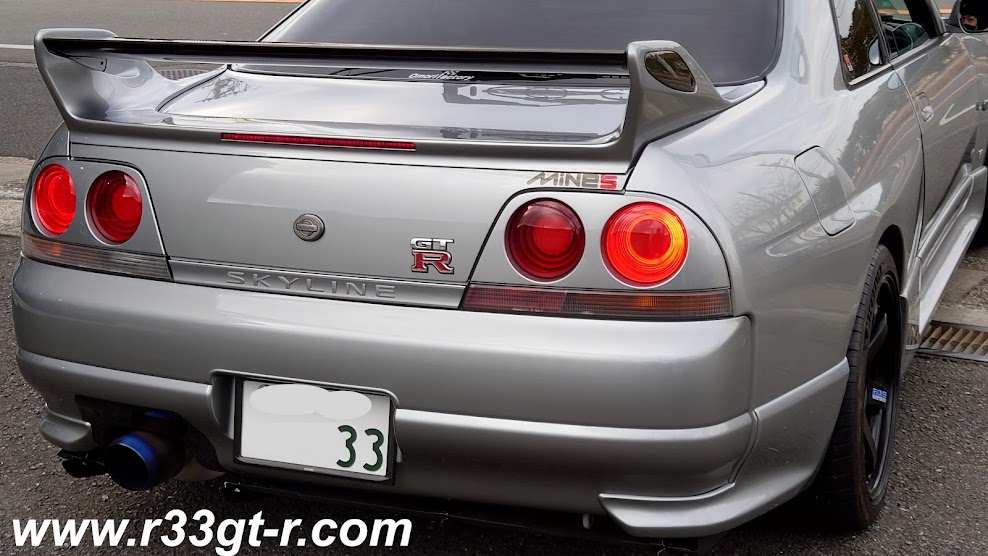
For example, one well known difference is the rear fog light that replaces the right side back up lamp:


Obviously, the Series 1 (or “zenki” [前期] model in Japanese) is the R33 GT-R in its original form. Introduced for the 1995 model year, the comparisons being made at the time were naturally against the R32 GT-R (how it was larger, heavier, but faster and better handling, etc). It is important to note for all R33 GT-R fans that, it was this zenki model R33 GT-R that set the under 8 minute record at Nurburgring. The modifications made later are obviously not those that required significant capital and resources for Nissan to implement. Which really is another way of saying that the Series 1 models were so good that, most improvements in the Series 2 and 3 were really only cosmetic!

Some General Stats:
Total number of R33 GT-Rs ever made: 16,250
(compare this with 43,934 R32 GT-Rs, and 12,175 R34 GT-Rs)

Standard cars: 9,871
V-Spec cars: 6,551 (including N1 versions)

Number of cars by model year:
1995: 8,446
1996: 4,093
1997: 2,708
1998: 1,175

Note: These numbers I copied out of GT-R Magazine. Don't ask me why they don't add up!

R32 GT-R vs. R33 GT-R:
According to my resources, (catalogs and third party books), some of the less obvious differences between the R32 and the R33 are:
1) Elimination of telescopic steering
2) Smaller trunk space due to relocated battery to rear, and strut bar
3) Smaller gas tank – reduced from 72 liters to 65 liters
4) Elimination of the Active Sound System that came with the R32’s stereo.
5) ECU changed from 8 bit to 16 bit.

BCNR33 Series 1 (前期 or "zenki"):
For the Series 1, the available colors were as follows:

LP2 – Midnight Purple
BN6 – Deep Marine Blue
QM1 – White
KL0 – Sparkling Silver
KN6 – Dark Grey Pearl
KH3 – Black
AN0 – Super Clear Red (special order optional color)

The Series 1 chassis numbers range from BCNR33-000056 to 009270 (and apparently with numbers 000094-000100 missing!)

BCNR33 Series 2 (中期 or "chuki"):
For 1996, a few improvements were made to the car:
1) The addition of a front passenger airbag as standard (it was a factory option in the Series 1)
2) The change of the driver steering wheel from a large airbag type to a more compact and sporty type

(photo courtesy of gtr-world.net)

3) Changes to the shape (more 3-D) and material (cheaper feeling apparently) of the dashboard surround
4) Center console is shallow compared to before (could file CDs upright in the zenki one - reason why is the addition of an additional airbag computer underneath)
5) Deletion of coin slot next to power mirror controls
6) Rear antenna switch moved from above left knee to left of steering wheel behind wiper stalk (replacing the blanked off switch)
7) Changes to the rear finisher (the “Skyline” lettering under the trunk is more pronounced).
8) A special “LeMans” edition car was released in limited numbers – its color was Champion Blue and the car had N1 ducts in the front bumper, a carbon fiber center rear spoiler with adjustable flap, hood top molding, and special commemorative stickers on the C-pillars. These cars were offered for sale only over 2 months during the summer of 1996. [Note: a FAST look-up shows a total of 177 of these cars were built.]

Available Colors:
LP2 – Midnight Purple
BN6 – Deep Marine Blue
QM1 – White
KR4 – Sonic Silver (replaced KL0)
KN6 – Dark Grey Pearl
KH3 – Black
AR1 – Super Clear Red II (special order optional color) (replaced AN0)
BT2 – Champion Blue (for LeMans cars)

The Series 2 chassis numbers begin at BCNR33-021001

BCNR33 Series 3 (後期 or "kohki"):
But then in 1997, Nissan made more than a few improvements to the R33.

The Series 3 is the only one that came standard from the factory with:
1) Xenon headlights (which also means that unlike the others, once on they always stay on, even when using the high beams at night)
2) Larger front lip spoiler (an additional 20mm) – (but with an option to order the shorter one from the earlier models). This also means larger brake cooling ducts.
3) N1 ducts in the front bumper
4) Left side turn signal “grill” is cut out for maximum airflow to optional oil cooler.
Here is a photo of the front of my car, you can see all of these above changes:


5) ABS braking system actuator unit is smaller, with reprogrammed logic to improve stability in braking while cornering situations.
Compare the Series 1:


With the Series 3:

(both above photos courtesy of Global Auto)

6) Right rear back up light changed to a rear foglight (see first photo above)
7) On braking, only the outer rear taillights light up (not all 4):


8) Door window glass changed to “long life hydrophobic glass”
9) All glass received an anti-UV coating.
10) Interior (seat, door trim) with red accents instead of blue
11) Changes to dashboard facia material texture (somewhat rough tactile feel)
12) Additional bracing in the trunk rear floor area attaching the rear suspension mount to the floor in order to improve the car’s rigidity. Said to be the equivalent of adding another strut tower bar, and also has the added benefit of strengthening the rear crumple zone.


Available colors were the same as for the Series 2, except there was no BT2 color.
(Edit: As Sean Morris reminded me below in a comment, some of the very last cars were available in an R34 GT-R color, GV1 Black. Thanks Sean!)

The Series 3 chassis numbers range from BCNR33-040001 - 043743 (this includes the 4 door R33 GT-R produced by Autech)

******
So I think that's it! IF I missed something, please let me know. OR if there is a photo of something that should be added here, let me know!

References and Acknowledgements: (some of these links are no longer active)
http://www.gtr-world.net/gtr/archive/1795 

http://www.gtr-world.net/gtr/archive/1877 (photos of chuki model)

http://www.gtr-world.net/gtr/archive/1894 (photos of kouki model)

http://www.ilovegtr.com/bcnr33_hist-models.html

http://www.global-auto.ne.jp/stock/public_model_home.php?model=BCNR33

R33 Skyline GT-R Best album (Cartop Mook)
I Love R33 Skyline GT-R (Neko Mook)

GT-R Magazine
Monday, January 16, 2012

Tokyo Auto Salon 2012

Since this is a blog about Skyline R33 GT-Rs, to be honest there really wasn't much if anything I saw yesterday at the Tokyo Auto Salon 2012 that has to do with the R33. Actually come to think of it, I only saw 1 R32 (Garage Yahata) and the only R34 I saw was a sedan (apparently I wasn't really paying attention...). No R33 sadly. It appears the major tuners are focused on the R35, with HKS and their 4.1L R35 for example. Bodykits from BenSopra with the engine hood opening up clamshell style from the front, wide body kits, etc. And obviously everyone was excited about the new FT-86.

For a good overview and pictures of cars, check out Dino's write up at Speedhunters:
http://speedhunters.com/archive/2012/01/14/gallery-gt-gt-tas-2012-day-1.aspx

Oh, I guess he had time to make (leave?) his mark while he was at it...


So why did I bother going, if this was the reality? Well, on one hand the gang from the UK/EU GTROC club is here visiting for a week, and as their official Japan representative, it wouldn't be the same if I wasn't there to help them enjoy their day.
http://www.gtr.co.uk/forum/138263-japan-2012-a-28.html#post1562459
http://www.gtroc.org/guest-writers-blog/tokyo-tour-2012-day-2

But also, it was a chance to catch up with a few friends and finally put a face to other friends and names (I had never before met Luke Huxham of Maiham Media before...).

I also saw Drift King Tsuchiya-san at the Mugen stand giving a talk show, Hoshino-san of Impul signing autographs, and later, I had the distinct honor of being introduced to Hasegawa-san of HKS (He's the "H" and the CEO)!

I did find some Skyline related stuff at the little bookstore though. Check this out - a whole book dedicated to the R31!


And in the R32 dedicated book - can anyone guess who this guy with the mullet is (hint: Tomei)?


Ok, but seriously....

Yes, I just couldn't get THAT excited about the newer cars there and how they were tuned...so what I decided to focus on was to hunt for stuff I could apply to my car. Judging from these crowds, LED lighting for cars is the next big thing for DIY tuning.


I also saw some new wheels from Rays that would be compatible with my rotors, as well as samples from companies for aftermarket rotors....the more selection, the better!

But it was also a chance to make contact with Obayashi Factory who are considered the best aftermarket interior "tuners" in Japan. I spoke at length about having the interior of my car redone in leather, for example, as well as some other ideas I have... Regardless it looks like a trip there to get estimates will be necessary in the near future!

But I DO promise my car will not end up looking like this Hummer:

Friday, January 13, 2012

Sunako-Jukucho is Back! (or, how I got ready for the SSCT Track Day at Fuji)


Those of you who have read this blog for awhile may remember this entry -

http://www.r33gt-r.com/2008/07/photos-from-sunako-juku-last-lesson-at.html

Sunako Jukucho (real name - Teruhiko Sunako) was, before his retirement in 2008, one of the top professional race drivers in Japan, well known in GT-R and Porsche circles. He also taught a select few students, running a high performance driving "juku" (prep school) hence his nickname "jukucho" (literally prep school master).
Here is his bio (in Japanese, sorry):
http://ja.wikipedia.org/wiki/砂子塾長

Anyway, I was pleased to find out that his retirement from the car world was short-lived. At a recent social gathering, I found out he was back in Tokyo and now in charge of introducing the Base Performance Simulator (one of only 5 in the world) to Japan. Essentially, it is a high performance racing simulator, kind of like the PlayStation Gran Turismo game series...but on steroids.

Developed by double LeMans winner Darren Turner, the BPS system is recognized as being literally one step below the full on million dollar simulators F1 Teams use to train their drivers. Read more about how fantastic this simulator is here.
http://www.baseperformance.net/

Due to my status as a former juku-sei (prepschool student) of his, I was lucky to be invited to try this machine out before its unveiling to the paying public.

As I had been recently too busy to really think about my past driving both good and bad at Fuji, this was a perfect opportunity to remind myself of my weakpoints - ie sections of the track that I always seem to have trouble with - and work on improving my techniques not only by driving in the simulator, but getting advice directly from Sunako-san.

How fantastic is this? I can try different things before actually hitting the track and risking damage to my car (as well as any others that might happen to be there if I spin out)- Fuji is a high speed track after all, so a mistake can be expensive!

First time I hopped in, I was embarrassingly slow. Yes there was some initial disorientation - I mean the displayed images made me dizzy in the beginning, but then you get used to it. The wheel has force feedback, but this simulator doesn't move up, down or sideways like some others. But it was also the vehicle I was virtually driving, a GP2 formula car... The thing accelerates so quickly that if you're not careful, just like in real life, your car suffers oversteer and... yes, you spin. And braking - no power assist here! Just like a real formula car. And the force feedback is so strong sometimes I was glad I heeded Sunako-san's advice and brought my racing gloves. So getting used to the virtual car for me took some time.

But once I started getting used to the formula car steering wheel, and the DSG style shift paddles, and the acceleration and the braking - then it quickly became apparent that I had a whole list of weak points on how to drive the Fuji track itself - for example, how to take the Coca Cola corner properly without upsetting the balance of the car, the proper entry speed and clipping points for the 100R, braking and acceleration points for Netz Corner, and the proper line for Panasonic Corner - and those are just the obvious ones.

And the result - during the actual SSCT track day, I found myself flying through Coca Cola corner with no fear, my car behaved exactly as predicted and simulated. Other problem areas were not much of an issue too, although the number of cars on the track that day made taking the ideal lines more the exception than the rule...but anyway, the simulator did its job and got me prepared!

No photos from my first session, but after my actual track day at Fuji, I went again - this time with another juku-sei, Russ of RE-Xtreme. Here are some photos he took, plus some more on his blog entry: http://re-xtreme.blogspot.com/2011/12/base-performance-experience.html

So check this out - First Corner approach (Russ driving):

Then coming out of first corner, accelerating and mentally getting ready for Coca Cola Corner (me):

Getting ready to brake before Coca Cola (Russ):

Another tough corner for me, Panasonic Corner (and what's distracting is, that LCD billboard on the upper right, ACTUALLY plays Panasonic TV commercials...!!!)

Then down the straight:

Then the Motec software, which keeps a running tab on what you're doing, displays it all for Sunako-san to breakdown and analyze. Brutally.

But you know, I'm really glad I had this opportunity. It's so much better to spin out and wreck virtually than in your own pride and joy...

Anyway, for those who might be interested in preparing for their own track days, the simulator has, on file, in addition to the major tracks in Japan, dozens of tracks from around the world, ranging from Laguna Seca to Nurburgring.

Actually, the true benefit of this simulator is - my car is already very well prepped - I am the weak point. So instead of going to the track, which costs time and money, plus puts wear and tear on the car, polish my driving skills on this simulator first! So next time, I will hopefully be able to extract the maximum potential of the car...

For more information or to arrange your own session, Sunako-san can be contacted at: sunako@yukes.co.jp

Here is a link to his blog, where, in addition to more pictures and information on the simulator, if you read long enough, you may stumble upon a picture of me...
http://star.ap.teacup.com/sunakojyukuchou/

He does understand some English, so don't be shy... And tell him I sent you!

Wednesday, January 11, 2012

Mods for the Track Day, Part 2

Ok so I think we can all agree that changing out the stock steering wheel for the Ital Volanti one was a good move. Whether I can justify it on a street car - I now have no driver's side airbag - remains to be seen (although I have read somewhere the airbags, especially those made in the 80s and 90s, tend to only have a shelf life of around 10 years...)

Another mod that I did - well to be honest it is harder to critique. Either I'm not sensitive enough of a driver (see my next blog post...) or the improvement it made to my car's performance is too subtle to be noticed unless the car is driven on a circuit which results in the rear stepping out more, and causing the front wheels to have power going to them, thanks to the ATTESSA operating.

That's right, despite harsh critiques on the GTROC forum,
http://www.gtr.co.uk/forum/158861-digital-g-sensor-improve-attesa.html

And the fact that apparently someone somewhere is actually developing a new programmable and faster ATTESSA ECU -
http://www.gtr.co.uk/forum/150416-upgraded-programable-faster-attessa-ecu.html

I chose to go ahead and buy this:


The digital G-sensor for the ATTESSA system from Do-Luck, that replaces the old analog (oil based) one. I mean, if I could get the Do-Luck product NOW but no one seems to know when this new ECU is going to come out - why not? And if it helped me on the track...

Click on this link to go to the Do-Luck website - they have some English describing the theory about how this device works.

Because I was curious about whether a digital g-sensor made such a difference versus an analog one, I actually picked up the phone and called Do-Luck directly. In summary, what I was told was, that in older cars with worn out sensors, this was the cheaper and more reliable replacement alternative, and for the newer R33 and R34 GT-Rs, there was still a difference to be felt.

Orito-san of Do-Luck explained that the units had been tested by several people, both on the street and on the track. Everyone said they could tell the difference, even on the street. Of course the biggest difference was felt in the R32s, as they are older and those initial G-sensors were more primitive.

When I asked about how much of a difference, Orito-san explained it to me this way - the G-sensor feeds a signal to the ECU, and then the ECU tells the ATTESSA pump what to do. So basically they can't do anything downstream of the ECU (that would have to be mechanical), but they are maximizing the speed between the G-sensor and the ECU.

Apparently, with the older analog sensors, people had to be careful not to apply the gas (when sliding) too early. Reports from the track are that, they can get on the gas much quicker now, response is much better in that way. I guess it's like our brain/feet directly activating the ATTESSA pump versus one second time lag that always seems to be there before the pumps activate.

He also mentioned that, compared to the stock system, people said the front torque meter didn't react as wildly - I think this suggests that because the power is getting to the front quicker, the car doesn't need to apply the full 50% to the front wheels?

And the actual result? Well I'm not sure exactly if my full on braking was improved on the Fuji straight before the first corner, but I DID feel the car behave differently than before on two occasions - one at Dunlop corner - (this is when you are forced to slow down to negotiate a low speed hairpin but then immediately get on the gas as you head up towards the main straight) and second when I momentarily lost control, the car reacted immediately to pull me out.

Install is easy:

Remove the center console, the gold box is the analog G-sensor.


On the R32, apparently you can simply strap the digital sensor on top, but that did not work for me, so I was forced to remove the old G-sensor:


And then just plug in (remove the plugs from the analog sensor), and while they provide some double stick tape, I choose to use a ziptie for good measure. Note that the sensor must be flat, and the arrow pointing towards the front of the car.


I do hope to have further opportunity to test the G-sensor... maybe I'll do some drag launches next time on the street and see how the car reacts?

Monday, January 9, 2012

A Professional Film of the Dyno Run!

Everyone check this out! You may have already seen this on my Facebook page but...

When I had my car dyno'd at Uchida Car Works... Dino Dalle Carbonare decided to try his hand at taking video with his Canon DSLR...his first time ever? Luckily Luke Huxham of Maiham Media agreed to do the post processing and editing, resulting in this beautiful short film:


Tomei Expreme Ti from Luke Huxham on Vimeo.


Posted here with the explicit permission of Luke Huxham and Maiham Media.

Those of you who know Luke and/or have seen his work know that he is a world famous young up-and-coming professional videographer/cinematographer, and with this kind of quality, I am sure you would agree that, it's only a matter of time before he's widely acknowledged as one of the top in the industry.

Thanks again Luke!

Thursday, January 5, 2012

Mods for the Track Day, Part 1

So I have previously hinted at some mods I managed to get done before the SSCT Track day at Fuji Speedway a few weeks ago. Well, here is one.

After being publicly chastised on Facebook for having a stock steering wheel (admittedly it was worn out and it had always bothered me as to why it was so thin and cheap feeling... and also common to other Nissans at the time):


I went ahead and installed this: a rare Ital Volanti Imola R steering wheel that I found on Yahoo Auction for cheap, and had retrimmed by Robson Leather (link to my visit).


By getting Robson to do the retrim, I was able to specify their "European stitch" in the brightest color red string they had.

Finding the proper boss initially appeared to be another problem - most of them out there had cheap looking plastic accordion looking covers but I found this one by Daikei which has a nice "crinkle finish" cover.


FYI, here are some photos to show how the steering wheel swap is done:

Step 1: On the bottom of the wheel and sides of the stock steering wheel, there are plastic covers. Remove with a flathead screwdriver. Turn the wheel to one side to access the bottom, and disconnect the airbag and horn leads.

Step 2: On the left and right sides, you will see two screws (hexhead) on each side, remove those and the middle airbag section comes off (don't forget to unplug the battery first for at least one hour before starting...).


Backside of airbag module looks like this:


Step 3: You now have this - the center bolt is what you need to remove, I THINK it was a 19mm socket I used. BUT, important tip here - use force to loosen, but not completely remove this bolt. This is because the wheel has to come off, and it takes some force, so having the bolt loose but not off prevents the wheel from ending up in your teeth.


Step 4: Once the wheel is removed, this is what you will see:


Note the two leads coming out, that is the airbag lead and the horn lead. On the steering boss kit I got, it provided for a plug in resistor for the airbag, and a plug in lead for the horn (both attached here).

Step 5 to end: After attaching those leads, making sure the wheels are straight forward (it helps to mark the spindle before completely removing the wheel - that's what the masking tape is for by the way - and you can also see the paint I applied), attach the boss following the instructions that come with the kit. The boss should slide onto the spindle, and there are some "guides" that stick out to ensure the boss is on straight. The wire leads are taped around the boss itself, and then the cover goes on. Then you choose which adaptor plate to use and attach your steering wheel with 6 small Allen head bolts, attach the horn button (I chose to use a Nismo one I found) and you are done!


So what do people think? Like or dislike? As someone told me once "everyone has a Momo" so I wanted something different. Not a big fan of Alcantara, so leather was the choice. If I had to critique, I'd say the color of the leather could be a bit blacker, but that's about it. The wheel is about 2cm smaller than the stock wheel, and much thicker which means it feels a lot more sporty.

Anyway, yet still a couple of other mods to talk about, will be posting about those soon so stay tuned!