Tuesday, July 29, 2014

R33 GT-R Design Trivia (Part 1 - Seats, Tail Lights and Headlights)

In doing research to discover how the R33 GT-R improved upon the R32 GT-R, I came across some interesting tidbits on the R33 - some items which even I had not thought about before, as well as some which had always bothered me.  Before I post what I found on the improvements over the BNR32, I have three posts on BCNR33 design trivia.

Blue vs Red Interior Stitching:

I've always wondered why Nissan did this. Why was the Series 3 given the red stitching, but the Series 1 and 2 blue stitching? Notably, the seats also have red or blue inserts to reflect the rest of the interior.
From a Series 1 car: courtesy http://www.gtr-world.net/gtr/archive/1858
Series 3 car
It turns out that in the beginning, there WAS argument internally over the stitching color – either red or blue – but blue was finally decided upon as it was Nissan’s image color.

Remember this is how the old logo looked:

The Series 3 cars did make the switch to red – but this was apparently because the main body color switched from midnight purple to silver (as can be seen in the TV commercials):

The "Speed King" commercial when the car was first introduced in 1995:


And then the Series 3 commercial in 1997:


Anyway, as everyone knows, the R33 seats are simply reupholstered R32 seats.  A bit of history on the R32 seats.  When designing the R32 seats, they had 2 goals - seats that could keep up with the GT-R’s performance, and seats ergonomically designed to fit well and allow for long drives without tiring.

So they looked and examined seats from Porsche, racing cars, rally cars, Recaro, and even seats with good reputations from other sports cars.  But the most attention was paid to rally car seats.  Most seats (at the time) really only supported the hips, but rally car seats support the hips, thighs, and shoulders, etc. in several locations.  So the GT-R seat was based around a bucket seat design found in rally cars. Data on how the muscles move, blood flows were recorded and used.  Initially, the seats held the shoulders more securely, but test drivers and journalists all reports this to be tiring in nature, so the shoulder areas were trimmed. 

Also two different sizes were considered for larger and smaller drivers but eventually only one size was selected.

For the R33, different seats were again examined, including those from Group C cars, but they settled back on the R32 seats.

As for the seat material – initially the same stuff “exse-nu” (not sure of the spelling, as the name was in Japanese in the reference text) as on the R32 was considered,  but a better material with better feel and finer fibers called Lux Suede was used. Although a NASA space material and real suede were also candidates, Lux Suede was selected in order to keep the seats as light as possible.

Incidentally, the rear seats of the R33 were designed in response to complaints that the rear seats in the R32 were too uncomfortable. (Both photos below courtesy of SkylinesAustralia.com)
R32 GT-R Rear Seats

R33 GT-R Rear Seats

Head and Tail Lamps:

Nissan designers had to design the head and tail lamps within the parameters of two design elements specific to the Skyline.  Everyone knows about the 4 rear afterburners (which in fact WERE inspired by the afterburners of jet fighters), but the designers also had to follow the Skyline custom of having 4 head lights as well - apparently, every Skyline from the beginning had 4 lights up front, which is not true of all cars, for example Nissan's own Z cars did not.
AFTERBURNERS!
"AFTERBURNERS"
Speaking of the 4 tailights – it turns out that these rear circular lights are actually not perfectly circular, but slightly oval. The reason for this is that apparently, from afar, perfectly circular does not look circular (I've got to go out and measure them sometime!).  Also, the designers also claim that the donut design is necessary to make them look round as well.

The R33 GT-R headlights are different from the standard R33.  Naoto Shiraiwa, who designed them, explains that the design was based on Group C cars, and further the image he wanted to have was two eyes peering out from behind a visor shield of a racing helmet.  


From: http://www.lacar.com/?p=9538
It also turns out that light manufacturers wanted Nissan to use projector headlamps (like in the 32), but these required more depth than halogen lamps and further initially these lights were large and their use gave a disjointed look.

Incidentally, the R33 GT-R’s outer lens actually has vertical lines inscribed – this is so that if viewed from the side, the lens (apparently) gives a glitter effect!  What was also important from a design perspective was to make sure that these headlights actually looked like lights – looking securely forward.

The headlights on the 33 GT-R are actually 20mm forwards that of the standard R33.  This was because it was not possible to keep inside the hood area.

The front round turn signals were borrowed from the Nissan Figaro, although the color is amber to make distinctive. These lights were also later used in some 180SX models as well.
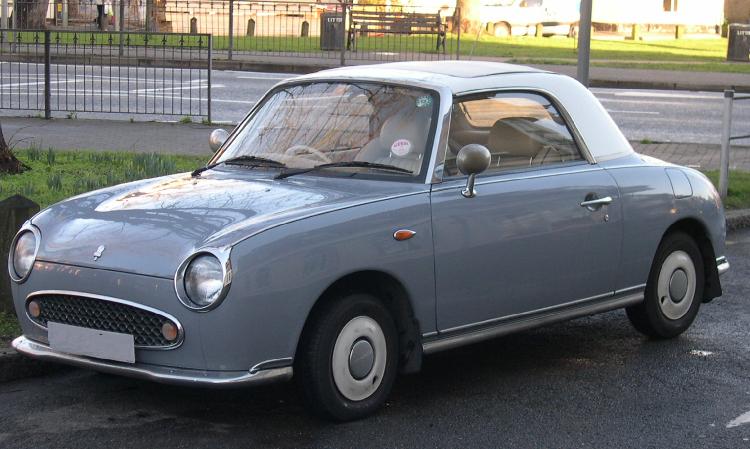
The Nissan Figaro. The resemblance is uncanny (not!)
from http://www.sillbeer.com/blog/entry/sweet-nissan-180sx-type-x-on-yahoo-japan-auctions/

Finally, what Shiraiwa wanted to do was to have an “S” mark inscribed in both the 32 and 33 headlights. (in the photo of the R30 headlamp below, you can see an “S” mark between the two lamps, at the top where the light doesn’t hit).

Next in R33 GT-R Design Trivia, Part 2: Emblem, Steering Wheel and Gauges

Friday, July 18, 2014

A New Type of Roll Center Adaptor

So I took a day off today as I had some errands to run and stopped by Do-Luck again as they are only 5 minutes away from where I live.
Looks clean as usual, right? Unfortunately not underneath!!
They have a new product which I've been interested in since its release a few months ago - their new roll center adjusters.  Actually, ever since I lowered my car by fitting the complete Nismo link set, I've studied, read up on, and been told that ideally the car should have some roll center adjusters.  I've been meaning to do so, but other stuff kept me distracted.  Here is a well written site which explains what they do, if you need a refresher like I did.

Moonface is probably the Japanese company best known for their roll center adaptors. Here is a photo of the kit for the BCNR33:

From: http://www.superlap.jp/item_detail/57/
Do-Luck has, however, recently helped in the development of this very interesting R33 GT-R which Dino has featured on Speedhunters:


And as you can see from this video, it is a very, very fast car (his time here at Fuji Speedway is about the same as a GT race car):


Anyway, this car runs Do-Lucks's new Roll Center Adaptors, available for the R32, R33 and R34 GT-Rs:


Which you can tell, by looking at the shape, are not your typical roll center adjuster/adaptor.  These work by not just restoring the angle of the lower arm (of a lowered car) to near horizontal/stock angles, but ALSO simultaneously work to restore the tie rods to their pre-lowered state.  In fact these may be the first ones on the market to combine roll center adjusters and tie rod ends into one piece.

Further, these are designed specifically for cars still running the OEM arms and OEM tie rods - in my case, I have the Nismo arm which is OEM shape but with stiffer bushes, and yes still the OEM tie rods. So perfect for my car!

Camber is increased another 1 degrees, and so with the Nismo links like me you end up with about 3.2 -3.5 degrees of camber.

Do-Luck offers these S7075 duralumin items in two colors - the anodized silver above, or anodized black. I went for the black, simply because I thought it would stand out from the rest of the suspension pieces.

For the left side, facing up
I actually took a bunch of photos as the install was happening, but having driven my car most recently in a rainstorm and not having properly washed the under carriage, I am choosing not to embarrass myself with how dirty the car was underneath!

But as I discovered, the install was not as easy as it could have been - maybe for a DIYer with the proper tools, it would be possible.  Basically, while it is obvious that the lower arm has to come off the hub, and the tie rod comes off of the hub piece as well, in my case, the brackets for the R35 Brembos meant that fitment was a bit tight - necessitating removal of the driveshaft to make sure everything was bolted up properly tight.  Then after it was all bolted and connected together, the alignment had to be redone as well.

Anyway - to get a better understanding of how and where it fits, here are some photos (and again, I am distraught about how dirty it is...)

Before (left side):
Looking from back to front - Circled in blue are the bits between which the Adjusters fit

After (Right side):
Looking from the front to back. Obviously the arm is not connected yet.

Looking from the front to back. Circled is the adaptor installed. Note lower arm is now connected.

Looking from back to front - you can see, circled in red, where the tie rod USED to be connected

View from the top - you can clearly see the tie rod is no longer connected directly to the knuckle

Driving Impression:

So after both sides were done, and the alignment fixed, I went for a spin.

The first thing I noticed was the steering felt lighter. Almost as if the power steering had gotten stronger, or the car itself lighter.   Ito-san told me this is because the tie rods are no longer in the "Y" shape, they are more parallel with the ground. In fact this is, if I recall correctly, how the car felt BEFORE I lowered it.

 I then noticed that the front wheels felt like they stuck to the road better because the car seemed to react a bit quicker than before, going left to right.  In other words, the car felt more "flickable."  Obviously, this is because the arms are also more parallel to the ground, and not doing the "Y" as can be seen in the Megan Racing link.

Finally, my biggest issue - on center numbness - seemed to have improved.  The zone (the angle of the steering wheel from left to on-center and then from on-center to right) over which the car feels relatively numb (remember I drove my friend's non-power steering NSX, which remains my personal benchmark) has shrunk substantially.  But dead on center, the feel can STILL be improved to be honest.

So I am one step closer to obtaining the kind of handling, both in feel and in response, I want with my car.  The more nimble handling (which I was told may actually make the car feel a bit jittery on bad roads), coupled with improved on center feel.

The only caveat I have is, these are expensive, with a retail price of 84,000 yen for the pair!  Perhaps I should have done some more research, but how much of an advantage do we gain by utilizing one solid piece vs corrections at both locations (by using roll center adjusters and tie rod ends)?  I guess one thing about high prices, however, is that likely not many people will have these on their car so it will add to the "bespoke" nature of my car.

So what do you all think? Post a comment and let me know! (and yes, I know, I'm still working on the R32 vs R33/R33 trivia blog posts...thanks for your patience on those!)


Wednesday, July 16, 2014

Best Motoring (Keiichi Tsuchiya) Review of the Series 3 GT-R vs. Impreza WRX vs. NSX 3.2

I'm still working on a bunch of posts on the R33 vs. R32 as well as some R33 trivia...in the meantime your patience is appreciated! 

I had found this video before (and posted it), but lost it when Best Motoring had it removed from YouTube.

But I stumbled upon it tonight, so while it lasts - and yeah the quality isn't great:
Part 1 (to about 8 min):


Tsuchiya reviews the then new Impreza WRX Type R Sti, vs the new 3.2 liter NSX, vs. the Series 3 R33 GT-R (non V-Spec).

Not surprisingly, he loves the NSX (engine power is nice, great brakes, very stable, easier to drive than the previous version), is impressed with the Impreza (very readable, like a well designed FR car).

Compared to older R33 GT-R models, he notes
1) the ABS braking is fantastically good (but the car is heavy... not surprising considering the other two cars)
2) Std car (not V-Spec) is more than enough if you're not always doing track days
3) Can really feel the front sticking to the road - this allows you to read how the rear is moving
4) Unfortunately he notes that the test car, without an oil cooler, shows the oil temp rising very quickly (by the 3rd lap)
5) Fastest of these 3 cars around this track.

In his summary comparison, the Drift King says that the car is significantly improved and of the three cars it's the most stable, and most confidence inspiring to drive at full speed. But yes the oil temp goes up too quickly, car should really have a large oil cooler for track running.

However, the brake balance, suspension balance, as you drive the feeling as its cornering, pointing it into corners, or stomping on the brakes, the GT-R had the best stability of the three.

What follows are a bunch of 0-400 runs, the results of which are obvious from viewing the video.

This second section begins by showing how turbo lag can really affect the GT-R's times (if the race begin at idle versus full revs, clutch drop).

The cars are then taken to Tsukuba for the famous Best Motoring "race" test. The results are again obvious if you view the video - with the lighter cars gaining an advantage over the GT-R.  Naoki Hattori complains that the brakes are weak, for such a heavy car.

Finally, whether those testers would buy each of the seven. Impressions of the GT-R:
Takuya Kurosawa points out that the car is on the edge of oversteer and understeer, depending on whether the turbo is spinning or not given partial throttle. That "delicious" neutral is hard to find and doesn't appear often.

Four of the testers would buy the GT-R; three would not.

Nakaya - (would not buy) If I were to get this, I'd get a V-Spec instead.
Tsuchiya - (who would buy it) retors - buy it on the premise you wouldn't take it to the track. You can have a family of 4 ride in it, no problem. And, a just a "bit" faster than most (family cars). I can't forgive it for being slower than an R32, but it's a "buy."

Ooi - (who would not buy says) Sure I'd buy it if I wanted to drive easy.
Nakaya -  then get a V-Spec.
Ooi - no, then the ride is too stiff.
Nakaya - well that's because the purpose is different.
Tsuchiya: So don't take it on the circuit, as a road car it's a good car!
Gan-san (who would buy): Yeah but the gas mileage is bad!
(everyone chuckles)

Aki comment: given how well known Tsuchiya did not like the R33 GT-R (he bought one after test driving a press car, which was fantastic. His personal car did not live up to that press car's performance after which his opinion soured), I am amazed he had relatively positive things to say about the GT-R.

Again, a few more days and I should be able to begin posting the posts which I have been conducing lots of research for.  Appreciate the patience!!

Friday, June 27, 2014

Fuse Tuning! (Yes Another Gimmicky Mod...Placebo effect?)

A few years ago, I read an article on "fuse tuning" in one of the many car /car parts magazines here in Japan.

The whole concept was basically an extension of using gold plated fuses to improve the sound quality in hi-fi stereo systems. (A Google search under "Fuse Tuning" will show a bunch of links on this.) The claim was that gold plated car fuses would enable the car's stereo to sound better, and the ECU to operate more accurately, etc.

But 24K Gold plated car fuses??!!   Just goes to show you that, with the proper marketing, car owners in Japan will try just about anything to extract just a bit more from their cars.  And yes that includes me, except I wasn’t about to spend 1050 yen per fuse(!)… imagine how much it would cost to replace ALL the fuses in your car?

However this concept seems to be a gimmick that quickly ran its course... still, the logic seems to be undeniable, we all see those gold plated stereo wires...

The leading company was called Ritz (which apparently now is out of business, surprise surprise) and had these types as well other types of these fuses:

From: http://www.geocities.jp/bigsingleworks/ritz.html

On this website that sold the Ritz fuses, they even have a dyno chart showing the before and after, and even better the car used was an R33 Skyline which shows a 0.5kg/m increase in torque, plus 18.7ps increase in HP!!

Apparently changing 10 fuses is all it takes!!

But 1000 yen per fuse?  Even back then, my cheapness won out…. However, just the other day, I stumbled on these very similar G-Fuses  (car fuses with 24 gold plated terminals from Amon, a popular car DIY company) on Yahoo Auctions – except now it was 490 yen for a pack of 10! So yes, couldn’t resist, although the fact that these are now clearance items tells you something…that in the end, even the Japanese consumers didn’t buy into the propaganda!

These aren't made anymore... and are listed as out of production on Amon's website here
According to some here in Japan, with the 33 in particular, having the battery located in the rear, plus the longest wheelbase (requiring the longest electrical harnesses and thus a drop off in the strength of the current) of the RB26 GT-Rs is the reason why, the 33 car tends to have electrical related problems - although I’ve never had a problem myself.  Then again, I’ve installed an earthing kit, and at the moment I’m not running electrical devices that would strain the system. However, in my quest to modernize the car, I suspect that it will require more electrical items to be added – thus if these G-Fuses provide any benefit at all, and they are cheap, then well worth installing them I think? Even the slightest benefit might help.

Let’s back up a bit – do a Google search, and you will see lots of debate on whether gold plating actually makes a difference.  The debate is particularly loud in the audio/video world:


The consensus though seems to be that gold, while not as conductive as copper or silver, does not corrode like they do, and also does not react with other metals.  Additionally, gold is malleable.  Thus, a malleable, non-corrosive and non-reactive metal (in the audio world, as gold plated terminals, speaker wire, etc.) appears to be the best way to improve electrical contact and thus connectivity.  People agree, however, that there should be no difference in sound quality.

So what would that mean for car fuses?
  
In most fuses, the metal used is zinc, copper, silver or aluminum, or an alloy of those metals. In car fuses, the metal most commonly used is likely zinc, for cost reasons.


So if you look at these G-Fuses, you can see that the terminal blades are plated (they claim) in 24K gold.  As a layman, I think that unless the entire fuse itself is made of gold, there won’t be any difference in conductivity of the entire fuse circuit, assuming that the metal part of the fuse is made of zinc overlaid with a thin layer of gold.

However, the packaging claims otherwise. 

For the 10A fuse, the company shows an improvement of about 2.7mmOhms difference in electrical contact resistance.  For 20A fuses, the difference is smaller.  So, like the audiophiles claimed, these fuses apparently improve electrical connectivity.

But would there be a difference in “sound quality” – in other words, would the improved electrical connectivity somehow improve the overall electrics of the car?

To answer this question, I found people’s impressions of these on Minkara (the Japanese all things car site):

To summarize, impressions are all over the place, some saying no change at all, others saying they feel a difference, etc.   The reality I believe is, if used in a simple, isolated circuit, you are more likely to detect a difference. But in a typical car, with hundreds of circuits and dozens of connectors (that don’t use gold), the likelihood of a single gold plated fuse making a noticeable difference, is slim.

Still, objectively I think these are “better” fuses than what is typically used.  So, let's try and see what happens?

First, the 20A fuse for the right headlight:

Before I switched the fuse for the RIGHT headlight

After: See the difference? Not really, yeah me too...

Ok how about the rear lights? 10A so maybe a bigger difference?

Before

After...I tried to stand in the same spot...a very slight difference? LOL

Conclusion: it's always smart to have extra fuses lying around, just in case, so IF you can buy these at a serious discount, then why not? Doesn't hurt, and in the off chance there actually is an objective difference, then great.  At the very least I can go around bragging about having gold plated fuses on my car now, lol!!


Thursday, June 12, 2014

Mini Aero Project - OK So That Didn't Work... What Was I Thinking?

So in my quest to modernize the car, in addition to mechanical and electrical items, I stumbled upon this:
Courtesy: http://parisworkingforart.wordpress.com/2010/06/06/lexus-lfa/
This is the driver side rear view mirror from the Lexus LFA - note it has the horizontal strakes built in, presumably to better manage airflow going around the car.  So I began to wonder if there might not be an easy to way to replicate this on one's existing mirror?

I found this:

From the manufacturer's description, this appears to be just what I was looking for!

Apparently, with the strategic application of these double stick tape rubber pieces, you can straighten out the flow of air around your car, and in the process, reduce wind noise!

For less than US$8.50 (JPY 830), this was too good not to try.

So while June is rainy season in Japan, on a sunny day I broke out the can of KR4 spray paint (which I still have left over from the fluidic nozzle mod) and spray painted the two pieces for the mirror in the hopes that they would blend in fairly decently.


Then on a trip to Chiba prefecture just today (to implement Step 1 of my long awaited audio upgrade... stay tuned, pun intended) I had the opportunity to try these pieces out.  Mounting was as simple of finding a place to put them, peeling off the double stick tape, and sticking them on:

On the B Pillar

This was the only place this piece would stick on the door sail

You can see the knob sticking out off the bottom of the mirror

And then it was a matter of driving to see what the difference was.

The verdict?

Uh... well... I could NOT tell the difference - not because these don't work - maybe they do - but because the road noise and engine noise coming in from the firewall area, plus the sound of the exhaust, basically made it too loud for me to hear any wind noise. For my audio upgrade, while I did lay down sound deadening as well as undercoating looks like I will have to do the firewall...

I even drove (a bit ?? lol) over the speed limit, in the hopes that at really fast speed wind noise would be more apparent - but no difference.  The only thing I DID notice, however, was that my BNR34 rear diffuser was working quite nicely - sending up a rooster tail of water at speed (it was raining quite hard by the time I was driving back home today).

Thankfully, again this aero mod cost me less than 850 yen to try.... maybe I can find a Prius to try it out on...

Monday, May 19, 2014

Tech Note: The R33 GT-R had ELECTRONIC SUPER HICAS + Yaw Rate Sensor!

So I've decided that, on occasion, I will do a "Tech Note" based on interesting stuff I find in those R33 service manuals I got recently.

So today, let's talk about SUPER HICAS. In the technical/service manuals for the R33, I found this page interesting (I've added English translation in BLUE):


HICAS is one area where there is lots of controversy. Some people swear it makes the car handle strangely and so you are better off without it. Others say it weighs too much - which might be an argument on the hydraulically driven R32 GT-R, but not only the electrically driven 33 and 34 GT-Rs.  (and yes, it's heavy on the 32... but if you remove it, you increase weight bias on the front wheels, which is not something you want to do... and is the reason why the battery was moved to the back in the 33, for better weight distribution. But I digress...)

Anyway, it appears that most people who lock out their HICAS, don't really understand how it works, at least in a technical sense. So, since I found this, I thought I'd share my findings. It won't change some people's minds, but for me, as a purist R33 fan, it confirmed that I want to keep it.

First, what is interesting is that the previous version HICAS, found in the BNR32,  did not have yaw rate feedback control, like the R33 GT-R did. There appears to be a lot of confusion out there with regards to this:
http://www.skylinesaustralia.com/forums/topic/70832-how-does-hicas-get-yaw-rate-feedback-in-an-r33/

http://www.skylineowners.com/forum/showthread.php?t=116708

No doubt, these guys couldn't read Japanese nor did they have their hands on this manual I have. For those who can, see the above - the white is the "normal" SUPER HICAS (found in other 33s), while the grey is what was added for the GT-R.

The take away is that, compared to the "normal" SUPER HICAS, the R33 GT-R (manual doesn't say others) had the yaw rate feedback added, in addition to the inputs for vehicle speed and steering wheel angle.

Here are two photos showing the 33's yaw rate sensor - it's located in the trunk next to the battery:


Apparently there was a preset map of yaw rate values to correspond to the actual vehicle situation according to the driver's intent.  The system would read the actual yaw rate value, compare it against the pre-programmed values, and then cause adjustment to the rear wheel steering to match the driver's intent.

The next page of the manual describes the yaw rate sensor as a tuning fork, piezo-electric, oscillation gyroscopic type. There are basically two types that exist - piezoelectric and micro mechanical: http://en.wikipedia.org/wiki/Yaw-rate_sensor

So I'm not sure if these kinds of piezo-electric sensor wear out, or need to be replaced. Would a purely digital one improve the performance of the HICAS? I'm also curious to know about the software and the pre-set map - how complicated is it?

The white part above could very easily handle having the rear wheels steer in the opposite direction at low speed in a linear fashion, and then in the same direction, at high speed, in a linear fashion.

The grey part - the yaw rate input must therefore be for unusual, high performance/race type situations where the car's rear end is purposely being slipped or where the traction of the road surface is slippery.  Naturally, this raises the following questions on how the MAP has been programmed - What happens when the car skids, or the rear end is sliding? And would there ever be a situation where something would cause the car to "wobble" at speed?  HICAS computer malfunction, for example?

Has anyone had any experience in reading the HICAS Map?

Finally, I wonder what, if any, improvements were made to the BNR34 Super HICAS ECU and its programming. Obviously the 34 has a slightly shorter wheelbase, which means that the rear wheels would need to steer at slightly less of an angle to give the same level of response as the 33. This would suggest that transplanting the 34 HICAS ECU into a 33, would not have a beneficial effect, unless there was something else improved about the 34 ECU, such as better maps, or faster processing, etc.  So I will have to research this...stay tuned!


Monday, May 12, 2014

A First: Professional Interior Detail (warning for those easily disgusted...)

Now this is going to be a tough post. Because the photographs won't do justice to the work done.

As most know by now, I tend to keep my car clean.  Very clean. But I've never taken my car to a professional for any cleaning work - until now.

The primary reason I did this time, was because I had recently driven to a place where, I suspect enough pollen accumulated in my car so that, even with the recently installed A/C filter (and yes on recirculate), my hay fever was still triggered.  I was sneezing so much, and my nose running so much, I had tissues stuffed up my nostrils...

So I had to figure out a way to clean the interior without suffering, and clean it such that there was a significant reduction in pollen.

Enter Kabe-san at RAPT. I've gone to him before in the past for some minor body work and for tinting my windows, but his true profession is auto detailing. So I was curious to see what methods he used as well, perhaps there would be some techniques I could use.


As you can see, pretty busy times for RAPT, right during the Golden Week holidays.

What bothered me most, was the amount of dust in the air ducts, like this, that I just couldn't seem to remove:
See all that pollen, dust, etc. on the bottom of the vent?
Anyway, Kabe-san had told me that he would remove the seats, and use steam. So I was curious to see what kind of difference awaited me.

He was also nice enough, to post on the RAPT blog, the steps he took to clean my car. I've taken the following photos, and summarized the steps from the RAPT blog at: http://rapt.livedoor.biz/archives/1980827.html

First step, before he took the photos, was to clean the dashboard. Then...

Remove front seats
Oh my, look at that dirt under the front seat. Yes, it's been a while since I vacuumed the interior thoroughly...


Adding Steam to loosen up the embedded dirt in the carpet

Using a "rinser" he then vacuumed up all the dirt and grime
Wow looks cleaner already!


Here is the driver's seat before any work
The Japanese description talks about how I was concerned with "sebumsebaceous matter" - in other words, 17 years of human sweat and oils...

Steam to break up the oils


The "rinser" again to vacuum it up...
I am assuming that this brownish matter is... organic??

The dirt just from the floor
Thank the lord this was dirt from the carpet, not stuff embedded in the seats!


Nice and clean after the steam cleaning... letting the seats and floor dry.
I'm not sure why that (seat) bolt is on the floor there, lol.

This looks clean
He didn't mention in his blog, but it's clear he steam cleaned the cloth inserts as well (after this photo was shot).

But using a special cleaning solution and sponge he rubbed this off...

After the above, he finished off other sections of the car, including the trunk!

He also told me he used a special tool to clean the vents:
You can see there is much less dust here!

What the photos don't show, is how the cloth materials now feel cleaner - like brand new - and the car smells different.  Before it had a slight industrial smell, but somewhat "manly." (a combination of smoke and engine blow-by... or so I thought)?? But now the car smells like new car...

Interestingly, Kabe-san told me that the previous (and first) owner of my car was a smoker (I'm not)!  To me, everything looked very clean, but apparently when he steam cleaned the ashtray, there was some tell tale brownish runoff - Kabe-san surmises the previous owner must have smoked with the driver's side window open, arm resting on the armrest... And actually, this explains why my armrest shows some wear there (the cushioning is gone).

He was also kind enough to put an "after" photo up on his blog.
From: http://rapt.livedoor.biz/archives/1981355.html
Unfortunately the photo is a bit blurred, but it would be hard to tell from any photo the difference, especially as I keep my cars relatively clean. But as I stated above, the difference is readily apparent from a tactile and olfactory perspective!!  And yes, no more pollen!

Anyway, given the pricing, which is very reasonable, this may be something I do once a year, as I do love the new car feel and smell.

PS - One thing we discussed afterwards - does anyone know of any makers of high quality automobile carpet? Would love to do such an upgrade...