Showing posts with label Headlights. Show all posts

Sunday, February 4, 2024

OEM Look LED Series 3 Headlights by VELENO! (@Tokyo Auto Salon 2024) - Part 2 (Q&A with Nakakuki-san)

 So as promised, I called up Nakakuki-san at Garage Chikara this past week to follow up on some questions I had, as well as several everyone was asking me, after my first post.

Question - this is too expensive! Why?

Answer - according to Nakakuki-san, those inquiring customers who have owned GT-Rs for awhile have all agreed that the pricing is fair or even inexpensive (note - I myself agree), with most of those who are complaining about the price being too high, either new GT-R owners or non-owners.  The price is high but on par with the OEM part; plus because of the limited numbers of the product being planned, there cannot be economies of scale like with an OEM company like Nissan.

Question - will this be available for vehicles in LHD countries?

Answer - the product/bulb already has the E-mark, if that helps; I did not get a direct answer but if your country requires, by law, the proper cut-mark (light pattern), I think it will depend on how many requests the company gets. This link has a nice diagram of the difference in light patterns.

Question - If your current headlamp housing is in good shape, why not just replace the current bulbs with LED bulbs?  

Answer - As you may know, the OEM Series 3 unit uses a D2 Xenon bulb for low beam and H1 for high beam.  However, in their research they could not find equivalent LED bulbs that satisfied their requirements. Also given the higher output of modern LEDs it is likely that you would want the lens to be precisely made in order to prevent excessive glare to oncoming traffic.

(see the Veleno IG page for the photo that shows how clean the cut line is)

Question - is it possible to buy the same new Veleno Mortale LED H11 bulbs and install in your current headlamp housings?

Answer - no, as the original housing is not designed for H/8H11 bulbs fitment.

Question - will there be a harness adaptor to allow use in Series 1 (Zenki), Series 2 (chuuki), as well as Series 3 (kohki) cars?

Answer - unsure about what method at the time of my call, but yes they will ensure the unit works with all variants of the BCNR33.

Question - where is the English language ordering website?

Answer - coming soon! (I will insert link here when it is up!)

Question - what is the origin story of this product?

Answer - it turns out that Matsuda-san and Nakakuki-san were at the 2022 Veleno end of year party (bonenkai) where they started to discuss how an LED product for their R33s would be a good thing.  They proposed the idea there to Veleno president Yumi-san, and one year later...  And meanwhile they also learned that the ballast units used in the Xenon D2 headlights are no longer available new.  Meaning that if the ballast unit dies, people have to find another source of lighting anyway (apparently this is happening on a frequent basis with Lancer Evos, which Nakakuki-san also services).  So further justification for this LED project.

Question - is this the same unit that Garage Active had advertised, briefly?

Answer - no. Apparently some guys from GA did make inquiries with Veleno to check this one out, however...right before that post was taken down...

Question - what about the R32 and R34 GT-Rs?

Answer - based on how well the 33 units have been received, they are in the planning stages for products for these cars as well.

Question - any other LED products for the 33 in the future?

Answer -  maybe...

Did I miss any? Let me know if any of you have any follow-up questions!

Monday, June 15, 2020

Problem Getting Car Ready for Shaken (Quickly Resolved)

Now this was unexpected...

A few days after I dropped the car off, and a couple of days before Nismo was getting ready to send my car to get shaken'd I got the following photos sent to me from Ochiai-san.

Hmm looks a bit dark on one side...
Interesting. Didn't know light was measured not in Lumens but in Hecto Candela for Shaken purposes

Yep, all that work to try to modernize the headlights and the right side bulb (showing a brightness of 71 hecto candela in the above photo) dies on me. Great.

Since I wasn't going to bother scrambling to find the exact replacement (Philips D2S/R bulb, 6200K, 3300lms - and no longer made!) nor was I going to pay an excessive amount of money for OEM (you know, I still have those bulbs somewhere...), I asked them to get something nearly equivalent in the aftermarket.

So they went ahead and got these.
From: SphereLight Website


So that's one problem (cheaply) solved. Hopefully.

What else?

Well, the HKS catalyzer. When taking your car in for Shaken, if you are running a non OEM catalytic converter, you need to have the paperwork from the parts manufacturer demonstrating that this part passes regulations. As I forgot to include this in the paperwork I left at Nismo, I had to scramble at home when I got the call and PDF it to them.

Looks like this - as you can see it has all the gas readings to show it actually reduces hydrocarbons...
This is actually for my old Apex'i one.
And then photos of how it's to look when properly installed.

The good news I got however is that the car passed Shaken and the guy didn't even bother to ask for this paperwork... oh well...

One more thing - I realized that I am getting a LOT of things done this time - but each item I have decided to do after lots of research and thinking (and budgeting, of course). So going forward, instead of showing everyone what I did when I picked up the car (which would be a very long post), I will be posting on the blog for each item I am getting done, and then when I pick up the car hopefully showing with photographs of the items on the car.

That should allow me to post more often, and in more detail! Next post coming soon!

Monday, January 9, 2017

Modernizing the Front Lights (Part 2)

Happy New Year everyone! Hope 2017 is a better year for all.

Anyway, as you recall in my last post I swapped out a first generation T10 LED parking lamp, as well as the OEM D2S Xenon bulb on the left front headlamp, for new units from Philips - both rated at 6200K in color and supposedly brighter than the norm.   

The results were promising
So, next on the list was to access the hi-beams and replace those too.

Wouldn't it be nice if all three bulbs gave off the same color?
Unfortunately, in order to access the hi-beam bulbs, the front bumper had to come off (by design - as reader Sam T commented in the previous post) because each of the headlamp housings are secured on the side by a bolt that is located directed directly under the upper side part of the bumper.  My friend (and BNR34 owner - check out his excellent blog HERE) Alessandro kindly offered to come by and help - I know from past experience that this task, while relatively simple, goes by much faster with two people.

See how compact Japanese garages are? 
So after driving it up onto ramps, I jacked the car up.
Safety first! Placed jack stands under the car.
Then I crawled underneath to unbolt the 3 piece undertray.

Truth be told, this was AFTER I cleaned it up, there was a lot of grease and oil on it! (see next photo)
Meanwhile Alessandro was busy removing the front grill and the two turn signal assemblies. And while I was under the car, I went ahead and removed the front lip spoiler as well.

Note, only the right side air duct came off. A rusted bolt prevented me from removing the one on the left in similar fashion. Something to resolve in the future!
So after removing the front undertray and the front lip spoiler, we realized that we did not have to remove the entire front bumper cover. This was because I have small hands and fingers which allowed me to access each of the single bolts on the sides of the headlamp housings. So instead of removing the bumper cover entirely, we only had to undo the two bolts on the left side to loosen the bumper cover in that area.
Green points to where that single troublesome bolt resides for the left side headlamp assembly.
 Orange is where I reached into to access that same bolt on the right side.
Then, all we had to do was to remove the nuts and 1 bolt holding the assemblies onto the frame of the car.
Green arrows point to the bolts and nuts that were removed.
On the left side, all that was left to be done was to replace the high beam H1 bulb.
You can see the base of the H1 bulb.
The OEM H1 bulb.
And here are the OSRAMs. Compared to OEM they are blue tipped.

And so how did these compare? Given it was still dusk, it was a bit hard to tell initially, but the photos show the difference (which admittedly is not drastic):
With OSRAM
Without OSRAM

Being winter time, the light quickly faded soon after and I was able to get the following photos:
The left front (right on photo) has been changed out, and is whiter than the OEM on the right (left on photo)

In the dark, the difference is more distinct - whiter, and more crisp with less distortion.
So, while not really close to the white of the Xenons or the parking lamps, you can see there IS a difference between the bulbs. First, the OSRAMs appear to be slightly whiter; second, the glow of the light given off was crisper, if that makes sense.

At night, to be honest I could not really tell much of a difference - the biggest difference was how bright the parking lights are now - with the garage door closed there was hardly a difference between them and the Xenons!

In any case - there is still room for improvement. So, I will continue to monitor light bulbs in the hope that one day, I can get an H1 bulb that is whiter AND brighter...

Saturday, December 31, 2016

Final Mod for 2016! Modernizing the Front Lights (Part 1)

So as I couldn't have my last post for 2016 lead with a photo of a GM product, I decided to close out the year with one last post with a legitimate parts mod for my car.  Normally, I would try to post this onto Speedhunters first, but given my inability to handle a camera properly, plus given the subject of this post, I was sure there would be lots of people pointing out the inaccuracies behind my understanding of automotive lighting, so I decided this blog would be the better forum. Oh, and having this post be the first of a two part series doesn't exactly help either, especially when I currently have no idea how it's going to look when all done!
This is the photo from the Speedhunters post that got me thinking about an upgrade
Anyway - several years ago, I jumped on the LED bandwagon and purchased two generic “T10” bulbs for the R33’s front parking lights.  Immediately, they gave a brighter and whiter light.  And then honestly I forgot about them until I saw the above photo. Given advances in LED technology, both in color and brightness, I decided it was time for an upgrade.

Currently, aftermarket LED parking, lamp, OEM Xenon and OEM high beam H1 bulb means 3 different colors... will it be possible to get all close to the same shade of white, while not diminishing lighting performance?
For me, part of “really paying attention to the details” in parts for my car begins with gaining knowledge through research.  And lots of it.   So I began reading up on automotive lighting and LEDs, with the goal of replacing the parking, low and high beam with the brightest bulbs (legally) possible.  Unfortunately, brightness (measured either by wattage or lumens) is not the main factor most sellers of aftermarket bulbs advertise. There seems to be a fixation on color, commonly measured in Kelvins (K).  I found most aftermarket bulbs are in the 6000K to 8000K range (i.e. bluish white to purplish white) in an attempt to get that “HID” look.  But “whiter” does not necessarily equate to “brighter.”  And for me, for safety related items it’s always function over form, although in the context of modernizing, I DID want a bulb that was whiter than a standard halogen bulb.

So the challenge was to find the brightest AND whitest bulbs possible.  This meant finding reliable sources that give objective figures on characteristics such as brightness.  
X-treme Ultinon series from Philips - the 130 lumens T10 bulbs are extremely hard to find!
I finally settled on these bulbs for the headlights (HID - D2S) and parking lights (LED - T10).  Not only is the brand reputable (with warranty, etc.) but the packages both list the lumens and Kelvin figures and coming from the same manufacturer, my bet was that the Kelvin rating was consistent across both bulbs. 

Unfortunately, it seems that at the present time, no major manufacturer makes an H1 bulb (whether halogen or LED) with a Kelvin rating of 6200K.
 

So, I took a chance and bought these "H1 bulbs" with a claimed color of 6000K and brightness of 80 Watts off of Yahoo Auctions Japan.  I figured that as OEM was rated as 35W, these should be more than twice as powerful.  There are actually many other designs now with cooling fans and fins, but because I wanted to keep the watertight seal in the back of the headlight housing, I chose to gamble on these which have the same dimensions as equivalent halogen bulbs.  So, my focus at this point was on the BASE of the bulb - this would have repercussions later.

The first step was to gain access to the rear of each of the headlight housings.  Even though this is a car born in simpler times, access was not as easy as it could be, although still simple compared to modern cars (at least my daily anyway). Or so I thought.
Green arrow - twist counterclockwise to remove the parking lamp bulb. And yes, I see all that dirt there too!
I was able to remove the airbox on the front left, which gave me some access to the front left headlight cluster.  I decided to swap out the parking lights first.
The existing LED parking lamp. You can see that only one surface, the yellow face, lights up.
Lit up, the LED casts a bluish white glow. Which turns out to be a weak purple as you can see in the leading photo above.
Here is the new Philips LED - it looks very futuristic and cool!
Lit up. Not only a whiter light, but in all directions. Can't tell from the photo but it was blindingly bright!
Success! See how much brighter the left front bulb is!!
My fingers are small enough that I was able to access the existing LED lamp, but it didn't help when I tried to remove the outer cap to access the headlamps. 

That's because there is this anti-tamper Torx screw at the base of the cap.
But after showing the above photo to some friends in ClubR33, the invite-only Facebook club I am a part of, they educated me as to which Torx wrench I'd need. So, I immediately ordered a special Torx wrench set, after which I was able to swap out the OEM DS2 bulb for the Philips bulb.
Front left bulbs (so right hand side of photo) are not just MUCH whiter than the ones of the right front (left side of photo), but the color appears to be the same for both the low beam and the parking light!
Note, I did consider using an LED to replace the HID bulb, but given the possibility that the light disbursement from an LED bulb might not work effectively with this old school HID and its reflectors, I stuck with HID (for now). I think that was the right decision.  I was pleased with how the light appears to be the same whiteness.

I haven't taken the car out on a dark unlit road yet, but a quick visual check at night, out of the garage lighting up the house across the street, revealed no major difference I could see.

So the last step was to replace the H1 hi-beams with these LEDs.


However, I discovered that the headlight lens assembly only allows a BULB that is shaped EXACTLY like an H1 bulb to pass through. So despite my ensuring that the LED bulbs had an H1 bulb BASE, these bulbs themselves could not be fitted. Back to the drawing board. And no, I'm not going to modify the headlamp housings in any way.

Some online research suggests these bulbs outperform the equivalent top model from Philips in terms of brightness and sharpness of light!
Luckily, a few hours on the internet and more advice from friends in ClubR33 and I seem to have found a solution for the H1 bulb issue - stick with a halogen bulb, just a high performance one which hopefully has not only better light output but a cleaner, whiter appearance as well to match.

The other issue was that, even with my small fingers, I could not access the bulbs directly from the housings. So, I will likely have to remove the headlight housings to do any kind of swap.

In what is a first for me, as I write this I don't know how this will turn out. Early in the new year, I will finish this job and post the results. Stay tuned, and Happy Holidays everyone!

Tuesday, July 29, 2014

R33 GT-R Design Trivia (Part 1 - Seats, Tail Lights and Headlights)

In doing research to discover how the R33 GT-R improved upon the R32 GT-R, I came across some interesting tidbits on the R33 - some items which even I had not thought about before, as well as some which had always bothered me.  Before I post what I found on the improvements over the BNR32, I have three posts on BCNR33 design trivia.

Blue vs Red Interior Stitching:

I've always wondered why Nissan did this. Why was the Series 3 given the red stitching, but the Series 1 and 2 blue stitching? Notably, the seats also have red or blue inserts to reflect the rest of the interior.
From a Series 1 car: courtesy http://www.gtr-world.net/gtr/archive/1858
Series 3 car
It turns out that in the beginning, there WAS argument internally over the stitching color – either red or blue – but blue was finally decided upon as it was Nissan’s image color.

Remember this is how the old logo looked:

The Series 3 cars did make the switch to red – but this was apparently because the main body color switched from midnight purple to silver (as can be seen in the TV commercials):

The "Speed King" commercial when the car was first introduced in 1995:


And then the Series 3 commercial in 1997:


Anyway, as everyone knows, the R33 seats are simply reupholstered R32 seats.  A bit of history on the R32 seats.  When designing the R32 seats, they had 2 goals - seats that could keep up with the GT-R’s performance, and seats ergonomically designed to fit well and allow for long drives without tiring.

So they looked and examined seats from Porsche, racing cars, rally cars, Recaro, and even seats with good reputations from other sports cars.  But the most attention was paid to rally car seats.  Most seats (at the time) really only supported the hips, but rally car seats support the hips, thighs, and shoulders, etc. in several locations.  So the GT-R seat was based around a bucket seat design found in rally cars. Data on how the muscles move, blood flows were recorded and used.  Initially, the seats held the shoulders more securely, but test drivers and journalists all reports this to be tiring in nature, so the shoulder areas were trimmed. 

Also two different sizes were considered for larger and smaller drivers but eventually only one size was selected.

For the R33, different seats were again examined, including those from Group C cars, but they settled back on the R32 seats.

As for the seat material – initially the same stuff “exse-nu” (not sure of the spelling, as the name was in Japanese in the reference text) as on the R32 was considered,  but a better material with better feel and finer fibers called Lux Suede was used. Although a NASA space material and real suede were also candidates, Lux Suede was selected in order to keep the seats as light as possible.

Incidentally, the rear seats of the R33 were designed in response to complaints that the rear seats in the R32 were too uncomfortable. (Both photos below courtesy of SkylinesAustralia.com)
R32 GT-R Rear Seats

R33 GT-R Rear Seats

Head and Tail Lamps:

Nissan designers had to design the head and tail lamps within the parameters of two design elements specific to the Skyline.  Everyone knows about the 4 rear afterburners (which in fact WERE inspired by the afterburners of jet fighters), but the designers also had to follow the Skyline custom of having 4 head lights as well - apparently, every Skyline from the beginning had 4 lights up front, which is not true of all cars, for example Nissan's own Z cars did not.
AFTERBURNERS!
"AFTERBURNERS"
Speaking of the 4 tailights – it turns out that these rear circular lights are actually not perfectly circular, but slightly oval. The reason for this is that apparently, from afar, perfectly circular does not look circular (I've got to go out and measure them sometime!).  Also, the designers also claim that the donut design is necessary to make them look round as well.

The R33 GT-R headlights are different from the standard R33.  Naoto Shiraiwa, who designed them, explains that the design was based on Group C cars, and further the image he wanted to have was two eyes peering out from behind a visor shield of a racing helmet.  


From: http://www.lacar.com/?p=9538
It also turns out that light manufacturers wanted Nissan to use projector headlamps (like in the 32), but these required more depth than halogen lamps and further initially these lights were large and their use gave a disjointed look.

Incidentally, the R33 GT-R’s outer lens actually has vertical lines inscribed – this is so that if viewed from the side, the lens (apparently) gives a glitter effect!  What was also important from a design perspective was to make sure that these headlights actually looked like lights – looking securely forward.

The headlights on the 33 GT-R are actually 20mm forwards that of the standard R33.  This was because it was not possible to keep inside the hood area.

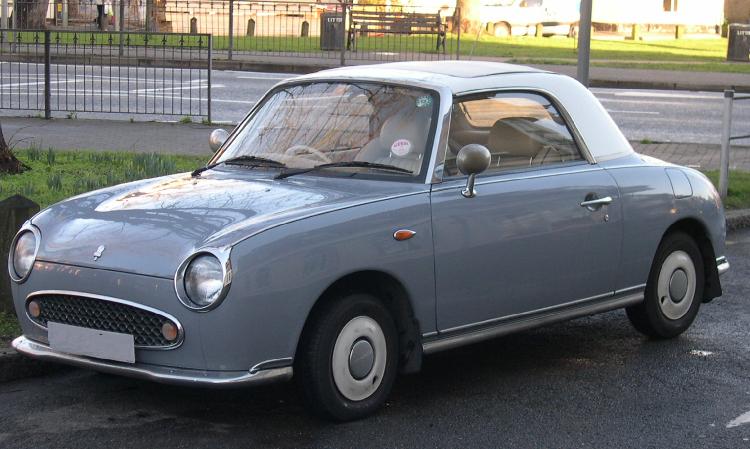
The front round turn signals were borrowed from the Nissan Figaro, although the color is amber to make distinctive. These lights were also later used in some 180SX models as well.

The Nissan Figaro. The resemblance is uncanny (not!)
from http://www.sillbeer.com/blog/entry/sweet-nissan-180sx-type-x-on-yahoo-japan-auctions/

Finally, what Shiraiwa wanted to do was to have an “S” mark inscribed in both the 32 and 33 headlights. (in the photo of the R30 headlamp below, you can see an “S” mark between the two lamps, at the top where the light doesn’t hit).

Next in R33 GT-R Design Trivia, Part 2: Emblem, Steering Wheel and Gauges

Friday, June 27, 2014

Fuse Tuning! (Yes Another Gimmicky Mod...Placebo effect?)

A few years ago, I read an article on "fuse tuning" in one of the many car /car parts magazines here in Japan.

The whole concept was basically an extension of using gold plated fuses to improve the sound quality in hi-fi stereo systems. (A Google search under "Fuse Tuning" will show a bunch of links on this.) The claim was that gold plated car fuses would enable the car's stereo to sound better, and the ECU to operate more accurately, etc.

But 24K Gold plated car fuses??!!   Just goes to show you that, with the proper marketing, car owners in Japan will try just about anything to extract just a bit more from their cars.  And yes that includes me, except I wasn’t about to spend 1050 yen per fuse(!)… imagine how much it would cost to replace ALL the fuses in your car?

However this concept seems to be a gimmick that quickly ran its course... still, the logic seems to be undeniable, we all see those gold plated stereo wires...

The leading company was called Ritz (which apparently now is out of business, surprise surprise) and had these types as well other types of these fuses:

From: http://www.geocities.jp/bigsingleworks/ritz.html

On this website that sold the Ritz fuses, they even have a dyno chart showing the before and after, and even better the car used was an R33 Skyline which shows a 0.5kg/m increase in torque, plus 18.7ps increase in HP!!

Apparently changing 10 fuses is all it takes!!

But 1000 yen per fuse?  Even back then, my cheapness won out…. However, just the other day, I stumbled on these very similar G-Fuses  (car fuses with 24 gold plated terminals from Amon, a popular car DIY company) on Yahoo Auctions – except now it was 490 yen for a pack of 10! So yes, couldn’t resist, although the fact that these are now clearance items tells you something…that in the end, even the Japanese consumers didn’t buy into the propaganda!

These aren't made anymore... and are listed as out of production on Amon's website here
According to some here in Japan, with the 33 in particular, having the battery located in the rear, plus the longest wheelbase (requiring the longest electrical harnesses and thus a drop off in the strength of the current) of the RB26 GT-Rs is the reason why, the 33 car tends to have electrical related problems - although I’ve never had a problem myself.  Then again, I’ve installed an earthing kit, and at the moment I’m not running electrical devices that would strain the system. However, in my quest to modernize the car, I suspect that it will require more electrical items to be added – thus if these G-Fuses provide any benefit at all, and they are cheap, then well worth installing them I think? Even the slightest benefit might help.

Let’s back up a bit – do a Google search, and you will see lots of debate on whether gold plating actually makes a difference.  The debate is particularly loud in the audio/video world:


The consensus though seems to be that gold, while not as conductive as copper or silver, does not corrode like they do, and also does not react with other metals.  Additionally, gold is malleable.  Thus, a malleable, non-corrosive and non-reactive metal (in the audio world, as gold plated terminals, speaker wire, etc.) appears to be the best way to improve electrical contact and thus connectivity.  People agree, however, that there should be no difference in sound quality.

So what would that mean for car fuses?
  
In most fuses, the metal used is zinc, copper, silver or aluminum, or an alloy of those metals. In car fuses, the metal most commonly used is likely zinc, for cost reasons.


So if you look at these G-Fuses, you can see that the terminal blades are plated (they claim) in 24K gold.  As a layman, I think that unless the entire fuse itself is made of gold, there won’t be any difference in conductivity of the entire fuse circuit, assuming that the metal part of the fuse is made of zinc overlaid with a thin layer of gold.

However, the packaging claims otherwise. 

For the 10A fuse, the company shows an improvement of about 2.7mmOhms difference in electrical contact resistance.  For 20A fuses, the difference is smaller.  So, like the audiophiles claimed, these fuses apparently improve electrical connectivity.

But would there be a difference in “sound quality” – in other words, would the improved electrical connectivity somehow improve the overall electrics of the car?

To answer this question, I found people’s impressions of these on Minkara (the Japanese all things car site):

To summarize, impressions are all over the place, some saying no change at all, others saying they feel a difference, etc.   The reality I believe is, if used in a simple, isolated circuit, you are more likely to detect a difference. But in a typical car, with hundreds of circuits and dozens of connectors (that don’t use gold), the likelihood of a single gold plated fuse making a noticeable difference, is slim.

Still, objectively I think these are “better” fuses than what is typically used.  So, let's try and see what happens?

First, the 20A fuse for the right headlight:

Before I switched the fuse for the RIGHT headlight

After: See the difference? Not really, yeah me too...

Ok how about the rear lights? 10A so maybe a bigger difference?

Before

After...I tried to stand in the same spot...a very slight difference? LOL

Conclusion: it's always smart to have extra fuses lying around, just in case, so IF you can buy these at a serious discount, then why not? Doesn't hurt, and in the off chance there actually is an objective difference, then great.  At the very least I can go around bragging about having gold plated fuses on my car now, lol!!