Showing posts with label Technical. Show all posts

Wednesday, November 4, 2020

A Necessary Mod? This Should Have Been An OEM Option...

In taking out all of the unnecessary and sloppy wiring that had been installed by others, there was one item I actually kept - kind of.  In fact given how quickly the battery tends to go dead in these cars, I think all GT-R owners should have one of these.

Ok not the best shot but here is how it arrived in its package:

I picked this one up in late 2011, but until I took my car to Worx I had simply used the included clamps to attach the leads to the battery, putting the CTEK charging unit itself into the trunk, and leaving the trunk slightly open to run the power plug to the wall.  

Nakamura at Worx had used the included direct connector (that connects directly to the battery) lead (circled in green below) and modified it.


And it was clever, right above the rear license plate there is an OEM rubber plug/grommet with wiring coming out to power the light bulbs for the rear license plate - and so it was easy to pass the wiring through this plug and leave the connector to be easily accessed (and then tucked away behind the license plate when not in use).

Green arrow points to the connector

The problem, however was that in order to extend it so it was long enough to connect to the battery he hacked this connector lead - in essence using the connector portion but dispensing with (cutting off) the in-line fuse holder.

If you look at the below, the arrow is pointing to the wiring he connected to the CTEK connector, which he then ran all the way to connect to the fuse holder he had mounted in the area next to the battery.  The fuse is still there, however it is now mounted on this fuse block, with other circuits (all positive side leads). So in theory this should work just fine. 

Green arrow points to the CTEK positive lead

But once I removed this fuse block, I was left over with only this really long lead, and without an in-line fuse holder; as with all things Worx I was really, really tempted to remove it, but since he had done a good job of tucking the connector behind the license plate, and then passing the lead through a rubber grommet into the trunk, I decided to keep it - but only after I improved it.

First, I had to restore the in-line fuse holder. After some searching online I found this:

So it was then just a matter of soldering this in, and then soldering a flat head electrical terminal (to allow a bolt to connect it to the battery) but the next problem was, for some reason the wiring he had done was unnecessarily long - so I ended up actually cutting off quite a bit off to eliminate excess. This then allowed me to zip tie it in a relatively stealth way to the OEM loom (green arrow).


You can also see how here I have wired up the fuseholder and then connected it to the positive battery terminal.

And the end result?

Yep, able to charge the car battery without opening the trunk lid, with no excess wiring taking up extra space inside the trunk - AND with the reassurance that the CTEK circuit is properly protected.  

More to come!

Wednesday, October 31, 2018

More LED Madness - Rear Lamp LEDs, Part 1

So even though the aftermarket offers full LED conversions for the 33's iconic rear lights:
From: http://qestjapan.com/itempage/r33.html
I never thought it looked right. Somehow, the natural analog glow from a light source behind the four red rings always looked perfect. And while modernization is a good thing, not at the expense of loss of character, I believe.  So I never really thought about an LED upgrade for the rear lights.

However...After my last visit to Hong Kong late last year, I had the pleasure to meet with a few like minded GT-R friends.  One of them had an R32 GT-R with impressively bright brake lamps.  When I asked, he told me he was using red LEDs in place of the standard bulbs. I had previously tried out a white LED bulb in the rear foglamp area and always thought it a bit uninspiring.

Doing some research, I found out that indeed, with a red lens, one SHOULD use a red LED. The Sylvania Automotive lighting website was particularly useful.

Courtesy Sylvania Automotive via Amazon
So the answer seemed simple - just buy one of the 1157R LED ZEVO bulbs from Sylvania Automotive's lineup - except the Amazon sellers I found would not ship to Japan. Plus, of course, just in case I would want a bulb that is recognized as legal for use in Japan, right? 

Thus, I began hunting for other LED manufacturers who sold directly in Japan.

Meanwhile, another issue raised its head. As you know, I have a Series 3 (kohki) BCNR33, which means when braking, only the OUTER 2 of the 4 afterburners lights up brighter. When not braking,  at night, the inner two and outer two turn on and have the same brightness.
When braking
When not braking all 4 light up evenly.
I knew that the outer two thus used a 2 filament bulb (1157 aka S25 double) rated for 21W and 5W, but had assumed that since the inside ones did not light up, those bulbs were single filament bulbs (1156 or S25 single).  Thus, I was planning on buying or creating my own adaptor  - 1156 socket (in the car) to 1157 socket.

Luckily, I then checked my own BCNR33 technical page and found that the series 3/kohki cars listed the usage of four 1157 bulbs - meaning that while the inside bulbs were also the two filament 1157s, apparently they never receive current for the higher voltage (because the braking current never reaches them).  Intrigued, I went to the car and found that indeed, the inside bulbs were 1157 bulbs, and their sockets were designed for 1157 bulb bases (180 degrees difference in the pins but pins at different heights).  But, only 2 wires leaving each socket, thus confirming that only one filament would be lit up.

So, this meant I could simply buy four 1157 LEDs. It also meant that I would not have to worry about different levels of brightness across different bulbs, if I used bulbs from the same brand and which had the same model number. 

The next step was to find an LED that actually fit! Many that I saw seemed to have new shapes much larger than a regular incandescent bulb. And, the LED would have to give off light not only to the sides but also directly to the rear (so near 360 degree illumination, just like the incandescent bulb).

So, back to the car to measure depth from the base of the socket to the edge of the inside of the lens (68.5mm) as well as the diameter of the hole the socket would have to pass through (26 mm).  The S25 bulb I measured was 24.6mm in diameter and 48 mm tall from the base. 

The caliper has a little rod that comes out the bottom to measure depth
Looking back at the left rear inside light.


Now came the heavy duty research part. First, while I studied the various designs available, most of these seemed to be cheap Chinese ebay-type offerings. I am NOT going to entrust my own personal safety to LEDs which might prematurely fail without warning.  That means I would like to stick to name brands, presuming their products are built to last.

Second, I wanted LEDs that would be brighter than the regular halogen bulbs.  To do this, I first had to look up the brightness of the average incandescent 1175 bulb. One site I found claimed a standard 21/5W bulb would have a brightness of 440lm and 35lm. I wasn't sure what to think of this as no LED 1157/S25 double bulb I found, could match these numbers. And yet, major brands like Sylvania and Phillips seem to be offering bulbs with lower lumens numbers yet claim they are brighter than the standard bulb.

I found another guide that demonstrated that for the same lumens, it takes more wattage for an incandescent bulb versus an LED bulb. And yet another showing conversion formulas as well as showing that incandescent bulbs have a typical luminous efficiency of 12.5-17.5 lumens/W versus LEDs at 80-100 lumens/W.

At this point, I was totally confused. The only thing I could figure out was there there appeared to be two types of aftermarket LEDs - those that use SMD ("surface mount diodes") and those that use CREE chips of various specs. The SMD bulbs almost always listed a large number of chips, while the CREE chip bulbs seemed to be more compact and have 8 chips or less.

What I ended up doing was ordering, again from Philips, their red S25 double bulb - approved for car use in Japan, and having a light output of 115 lumens (braking) and 15 lumens (taillight).

In my next post, I will demonstrate what happened when I got them...and my final decision on using LED bulbs...

Sunday, May 6, 2018

Breathing Better, Revisited

So let's take a break from the repairs to the interior of my car.

A few weeks ago, fellow R33 GT-R owner, OCD clean freak and buddy Tom Smith messaged me to let me know that, not only had he been inspired to do a mod for his car from something he had seen on this blog, but he had actually taken measurements to prove that, indeed the mod had beneficial results!
Tom's gorgeous 33!
So to review - 9 years ago(!!) in April 2009, inspired by the underside ducting found on the R34 Z-tune's bonnet, I posted this mod on improving airflow into the car's airbox.  Basically, I took a cheap aluminum radiator panel, made some cuts and folded down to create a channel for air to better flow into the OEM airbox.  Here are some photos from that post.

You can see the lines upon where the cuts were made
Added foam to prevent air leakage
You can make out the ducting from behind the grill
At the time of my post, I reported that I had better throttle response, but I had no way of measuring actual engine response.

Tom, on the other hand, runs a Power FC commander which measures intake temperature.  And he made a proper version of this air inlet scoop, as shown below - sides welded shut and the entire thing beautifully powder-coated.

First, as you can see Tom had the sides welded shut
And then powder coated matte black

That looks absolutely FANTASTIC! OEM like!
Likewise you can see the scoop behind the grill.
So, back to the numbers. In ambient temperature of around 16 degrees Celsius, in order to remove any variables Tom drove on a dual carriageway and for about 3 miles at 115kph in 5th gear. He then recorded the temperatures as he passed under the same bridge so as to allow the car to stabilize the temperatures.  First pass, without the panel was 38 degrees C.  Second pass, WITH this modified panel fitted, was 33~34 degrees C.

Doing the math, that's about 10% cooler!!

He also found "what is immediately apparent is how much more crisp it is on throttle response" - and yep this is exactly what I recall too.  It's as if the engine finally has the correct amount of air going into it in the first place.

So I suspect those who remove the stock airbox have similar thoughts - they can sense the instant response - but remember as temperatures rise under the hood, my thinking is that this kind of fresh air scoop is the only way to get the best of both worlds - more air volume but cooler.

Thoughts?

Big thanks to Tom Smith for doing this and providing me with the photos and the numbers. I wonder if there are any other mods I did in the past that others can improve on. If so, PLEASE let me know!!

Tuesday, November 4, 2014

Update #2 from Mine's...

So got an update from Mine's earlier today. Turns out, the problem was not one burst hose but two! Not sure exactly which hoses (they were behind the engine), but likely due to normal wear and tear? Or is something else to blame? I'll find out when I pick up the car hopefully later this week.

I had also mentioned when I dropped the car off, to Nakayama-san, that my car's exhaust stunk.  In fact it was overpoweringly bad. Mine's is reporting that this is because the catalytic converter (Apex'i Super Catalyzer) is dead.  I suspected this, in fact, and was thinking about getting another one to replace it.

from Apex'i website - http://www.apexi.co.jp/products/exhaust/cata.html

The Apex'i replaced the OEM one that was on the car when I bought it. This was a couple of years even before I had the Mine's engine put it, circa early 2006.

At the time, in my research I found that the Apex'i was the best catalytic converter because it had the lowest cell per square inch (cpsi) of only 130 cpsi - most other catalytic converters were in the 200 range (OEM is 400) and therefore more constrictive.

However, I always believed that catalytic converters pretty much lasted the entire life of the car, although now I suspect that is only true if your car is not highly tuned.

But a relief the smell wasn't necessarily caused by the engine. I've asked Mine's to go ahead and install a new catalytic converter - they've recommended an R33 GT-R specific one by HKS, which happens to be the one I was looking at anyway. Hopefully they will have photos of the old one for me to see how badly it had degraded.

The HKS one has 150 psi so a slight increase, however their website claims that their catalyzers have "high purification performance" - so something to look forward to, if true.  And if for some reason the HKS fails or dies in the future, at least its replacement cost is not as much as the Apex'i.

From: http://car.indac.jp/product_shousai.asp?hin=10123126012

In any case, as Mine's has the car for a few more days,  I've decided to ask them to do a full check of the car, in order to see if there are any other parts that could be suspect.  I'll post what (if anything) they find.  Hopefully this whole incident was just a wake up call for me to pay more attention to my car!

Stay tuned...

Monday, October 6, 2014

How The R33 GT-R Improved Upon The R32 GT-R (Part 1 - Exterior Design/Aerodynamics & the "High Traction Layout")


So although I've previously explored the differences between the R33 and R34 GT-Rs, and discovered that while the running gear basically stayed the same, with improvements to body rigidity and aerodynamics (as well as styling, of course) being the main differences, I hadn't yet really looked into the differences and improvements between the R32 and the R33 GT-Rs.

Nissan had a problem - the R32 GT-R was spectacularly successful - and its successor the R33 was bound to be in its shadow unless it was substantially better both subjectively and objectively.  While R33 haters may not like to admit it, the R33 GT-R is a technically much improved car over the R32 GT-R - so much so, if you recall the objective when designing the R34 GT-R, Nissan's goals were not to make it any faster than the R33 (it was deemed fast enough), but rather, just easier to drive for the average driver.

In any case, with all the information I found, I've split the discussion into two parts - this post, Part 1, which examines the improvements in the exterior  (design and aerodynamics) and the "High Traction Layout" (balance and body rigidity), and the next post, Part 2, which examines the Engine, ATTESA ETS PRO, and Super HICAS.

Exterior Design and Aerodynamics:

When development of the R33 (the general model, NOT the GT-R) began, it was initially conceived that the 2 door coupe would ride on a shorter wheelbase than the 4 door sedan. The coupe was to have a shorter hood as well (further, no turbo model was contemplated).  This all changed, however, when Nissan decided to put the coupe on the same wheelbase as the sedan.

We all know that the R32 GT-R excelled in the Group A racing series in Japan. However, the R33 GT-R was facing a different race series (N1 Taikyu), this one which required sustained speeds exceeding 250kph; this requires not just awesome acceleration but stable braking prowess as well.  Thus, Nissan decided to put heavy emphasis on aerodynamics during the design; and not just better aerodynamics, but balanced aerodynamics.

The R32 was developed with the “Zero Lift” concept in mind, hence it sported a large rear spoiler to help keep the car on the ground and provide stability in high speed cornering.  However, its coefficient of drag was 0.40, which was not something to brag about even back then.  Further, based on racing experience Nissan wanted the R33 GT-R to have superlative cooling and anti heat abilities, which would require large openings for the radiator and oil cooler.  The front spoiler would have to be a shape which would reduce front lift as well.

Nissan called the design theme for the R33 GT-R,  "Sophisticated Strength" -  while engineers wanted superior aerodynamics, cooling ability, and a wider tread, the designers wanted a design that suggested speed and power.

Here are some quotes on various design aspects from the chief of the GT-R’s exterior design, Hidetoshi Nishiizumi: (Source: Cartop Mook: R33 Skyline GT-R Best Album) (all Nissan Gallery photos from Wikipedia)


"The R32 had excessive front lift.  At Fuji Speedway, taking the high speed 130R corner at speed was scary, according to Kaz Mizuno (later father of the R35 GT-R). So efforts were made in the R33 to minimize front lift - and in that regard, the longer front overhang worked in our favor."


"We designed large openings in the front bumper, and made the shape spoiler-like. We experimented with various angles for the lip spoiler as well, to get the best wake separation for the air.”


“The size and height of the rear spoiler of the R32 GT-R were designed with Group A racing in mind. The regulations meant the wing could not be adjustable, so we put a big one on from the beginning.   The R33 GT-R had an adjustable one.  From the rear, you can see that it actually has a “Y” shape design.  Mizuno-san was heavily involved in the design.   Although it extends a total of 30mm on the sides, the size of the spoiler is limited.  We did experiment with a spoiler that would fit within the width of the trunk lid, but it looked unbalanced.   This is what lead to the current design with its overhang.”


“Compared to the R32 GT-R, what really gives the 33 remarkable presence is the larger spoiler on the back.  From the back, it really enhances its presence.  The reason we included an adjusting tool in the tool kit was so that the wing could be adjusted for track days – but in town, it looks best at horizontal.”

“We experimented with making the entire wing adjustable, but in the end settled only on angle adjustability and the caps on the sides, for weight purposes.  Also the reason why the rear is solid, but the front of the blade is adjustable, is just in case it became separated, it would move in the direction of generating downforce, allowing the driver to stop safely.”

The design was in a state of change until right before the car went on sale. You can see that the production car looks far more aggressive than the the prototype:
“Compared to the prototype, we widened the lower half of the body to give the appearance of a lower center of gravity.”
The R33 GT-R Proto - I'm not sure I see the narrower lower belt line?
Photo from http://www.gtr-world.com
You can see the solid, fixed position rear wing which has evolved from the Type M wing but is still not adjustable
Photo from http://www.gtr-world.com
Initially this rear trunk spoiler was a fixed position one, but at the very last minute a decision was made to go with the adjustable one we have now.  Incidentally, the original fixed spoiler design can now be found on the R33 GTS25t Type M.
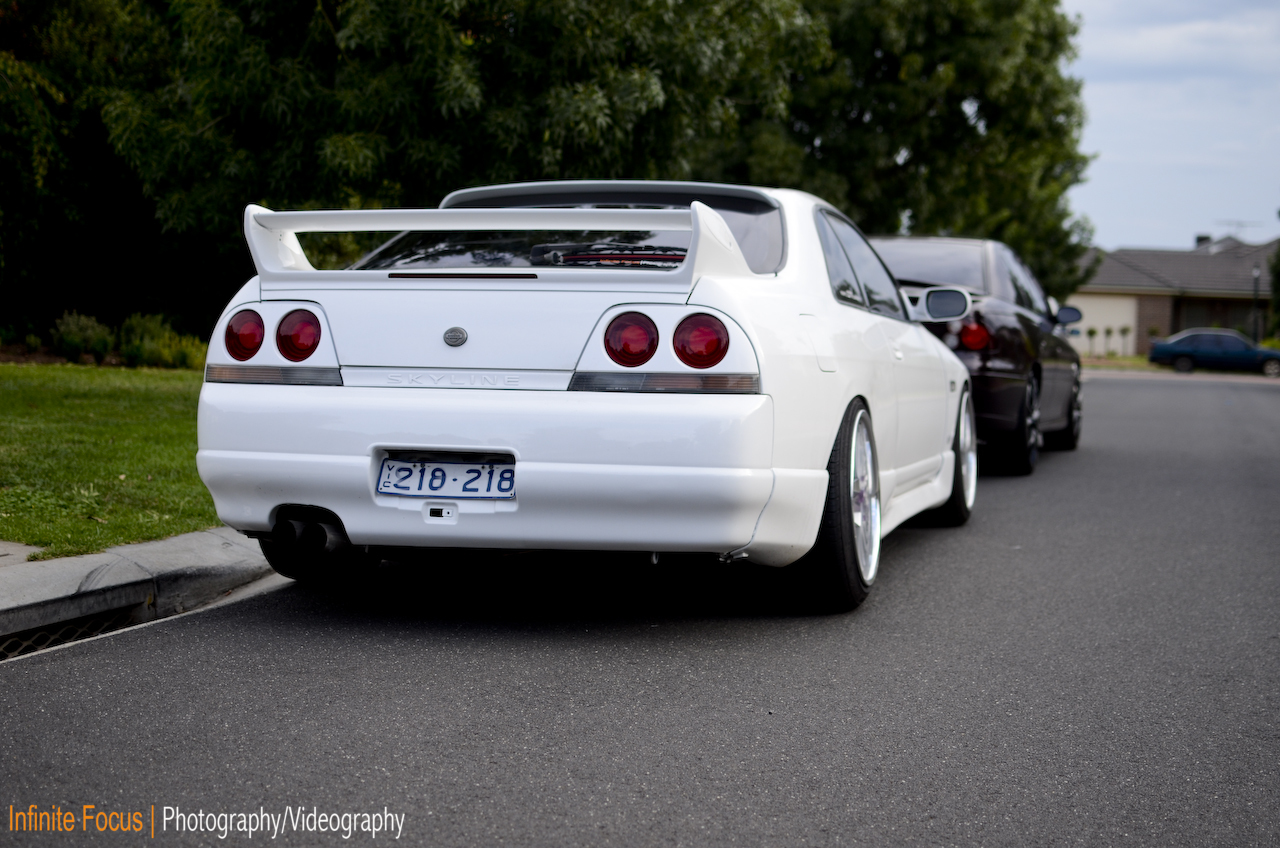
The R33 GT-R could have had this rear spoiler design.
Courtesy: http://asteriskblog.blog90.fc2.com/blog-entry-39.html
Also, one aero design that was considered at the time, was to have a roof spoiler in addition to the rear trunk spoiler.
GT-R could have looked like this, with the roof spoiler!
From: http://infinitefocusphoto.wordpress.com/2011/12/19/hangs-muskis/

There was extensive wind tunnel and road testing of the design, with efforts made to obtain the best front-back lift balance while allowing for wide tires, blister fenders and rear spoiler.  In the end the Cd equaled 0.35 (beating the R32's 0.40), and the front /rear downforce was better balanced, with a front coefficient of lift of 0.09, and a rear downforce of 0.03 (with the spoiler at the flat position). Even with the bigger body.

For a review, see this post

The "High Traction Layout":

In addition to the aerodynamics, the High Traction Layout improved the dynamic performance of the chassis.  This is Nissan's terminology for the technical chassis design differences which were designed to improve the performance of the R33 GT-R over the R32.  In addition to the improved aerodynamics, the High Traction Layout improved the dynamic performance of the chassis.  It did this by improvements in two areas: body rigidity and weight distribution.

Body Rigidity:
With the addition of front and rear strut tower bars, as well as adding cross bars under the floor in over 30 locations, rigidity was improved – 40% increase compared to the R33 GTS, and over 150% (1.5 times) more rigid than the R32. The improvements include, front tower bar, front cross bar (which connects the sides of the transmission tunnel), floor cross bar, the seat back center (the plate behind the rear seats), rear strut bar, etc.

From: "All About the New Skyline GT-R"
Four wheel multi-link suspension: The front layout was changed.  The R32’s weak point was the use of an “I” shaped upper arm, which was susceptible to rattles.   These were changed to “A” arms, which gave 90% more lateral rigidity. 

In the rear, Nissan added the “triple cross bar” – which adds more rigidity for the suspension members (in the R34, it also provided a nice place to hang the rear carbon diffuser off of… the 33 and 34 triple cross bar is the same, incidentally).

Having increased body rigidity means, of course, that power not only gets to the ground more directly, but the suspension behaves more accurately.  To the driver, this makes the car feel more nimble and agile, with more direct feel, and thus easier to drive.

Weight Distribution:

The Problem:  The R32 GT-R was criticized as being too front heavy, which lead to strong understeer.  Additionally, the fuel tank was placed below the trunk floor, meaning that there was weight overhang in the rear as well. Not only was the weight BEHIND the rear wheels an issue, but as fuel was consumed and the rear got lighter, there was an obvious effect on the car’s performance.  Combined with a less rigid body, the R32's potential was wasted.

The Solution: With the increased wheelbase, it was now possible to improve weight distribution; the plastic fuel tank was placed below the rear seats, battery moved to the trunk, and to the extent possible, heavy things were moved towards the center of the car.  The front and rear overhang weights were lightened.

 From: "All About the New Skyline GT-R"
But improving the weight distribution wasn't just about moving things around between the wheels - it also means reducing weight in critical areas to improve the balance of the car.  The increased body rigidity didn't help - the added bracing added to the car's weight, which meant that Nissan engineers had two compelling reasons to try to figure out ways to lighten the car.

Up front, to reduce front overhang weight, the front hood and fenders were made of aluminum (as in the BNR32), the headlights were made of lightweight plastic and the intercooler was lightened, in order to lighten the front overhang, reducing inertia.  The intercoolers were changed from extruded multi hole tube to inner fin type which improved response, cooled 4% better, and was 400g lighter.

Nissan engineers also found other ways to reduce weight, even by a few grams.
This includes:
Hollowing out the side door beams.
Using high tensile steel on body panels.
Reduction in sound deadening materials.
Super HICAS becoming electric.
Hollowing out of rear stabilizer bar.
Use of high tensile springs front and rear.
Shrinking the ABS actuator.
Light aluminum wheels with higher rigidity
The front and rear axles were made of aluminum (as in the BNR32) but also so were engine mount insulators and brackets
New plastics were used for : fuel tank, head lamps, super high strength "PP" bumpers, air cleaner, changing the headlining material, changing material of rear spoiler.

So even though the R33 was heavier by 100kg, the records show that it was 30kg heavier up front, and 70 kg heavier in the rear.

There were a few drawbacks to the High Traction Layout, however - although these were deemed worthy sacrifices to get better performance:

1) With the battery moved to the back, as well as the rear strut bar, trunk space and volume is smaller on the R33 vs the R32.
2)  Additionally, the fuel tank shrank from 72 liters to 65 liters… resulting in a lower range.

In any case, I think they did a great job on both the looks, aero and chassis development.  It is ironic that people criticize the longer wheelbase without understanding how Nissan engineers actually used that to the car's advantage from a dynamic technical standpoint - the longer wheel base is not just stability at speed in a straight line, but also with the High Traction Layout in corners too!

Next: Engine, ATTESA E-TS PRO, and SUPER HICAS

Sources:
1) Cartop Mook: R33 Skyline GT-R Best Album
2) Neko Mook: I Love R33 Skyline GT-R
3) Motorfan: 新型スカイラインGT-Rのすべて("All About the new Skyline GT-R")

Monday, August 4, 2014

R33 GT-R Design Trivia (Part 2 - Emblem, Steering Wheel and Gauges)

Continuing on the theme of interesting stuff I found out when researching how the R33 GT-R improved upon the R32 GT-R:

The Emblem:


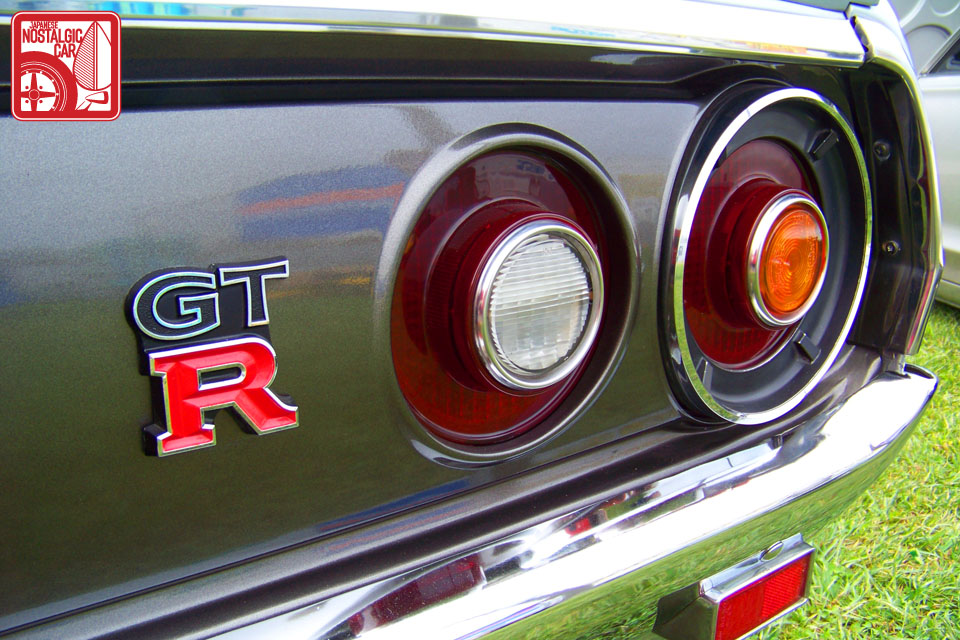
Nissan’s design division has one division that specializes only in emblems. For the RB26 GT-Rs, the GT-R logo used on the Ken Mary GT-R that debuted in Jan 1973 was the inspiration. That is, “GT” on top, a larger “R” on the bottom, and the “R” letter actually being silver outlined with red being painted within the outlines, to give it more presence.

From: http://japanesenostalgiccar.com/2011/09/13/events-2011-japanese-classic-car-show-part-01/
It turns out that at the time of the R32, the general design trend was to minimize badging or make them smaller, in order to give a clean look to the front of the car. Thus, the GT-R, like all R32s, only had the “S” symbol on the front hood, and only had the GT-R badge on the trunk.

However, the R33’s development chief Kozo Watanabe (who would later be in the same role for the BNR34), insisted on having a largish GT-R logo in the front as well, in order to strongly emphasize the car was a GT-R.  This was in order to let cars ahead, when looking in the mirror, see that a GT-R was closing in from behind!
So this is the view in the mirror as a lesser car is about to be passed.
From: http://www.skylinesaustralia.com/forums/topic/237956-in-motion-pics-of-my-r33-gtr/
Nissan's chief designer of the exterior of the GT-R, Hiroshi Nishiizumi, had this to say about the GT-R logo:
“The large GT-R emblem is in the middle of the grill because there is only ‘dead space’  - the hood latch - behind it, so it hides this part which we don’t want to see.  Also, the GT-R lettering is two level, just like the GT-R logo for the Ken /Mary GT-R.”

There is also a “GT-R” that is inscribed only on the left cover to the rear spoiler.  Ever wonder why it’s only on one side?
From: http://www.driftireland.com/forum/showthread.php?36087-Genuine-R33-GTR-Spoiler
This was done so that a driver being PASSED by a GT-R (in the fast lane in right hand drive countries,) would see at eye level, at the moment of being passed, what car had just passed him!

The logo designer was Ms. Junko Ito, who said her marching orders were to come up with an elegant and sporty design, larger than the 32 design on which it was based to reflect the larger mass of the 33, and fit it al into a square, while remaining well balanced.  The "R" was made larger than the "GT", and there was a black background to the letters.  Further the red used was more crimson than the brownish red used in the 32.

The Steering Wheel:

This is one area where I think the R32 is better -  its steering wheel, which was inspired by Porsche and BMW designs.  The objective here was being able to turn the wheel by sliding your fingers. It is simple, clean and functional:
From: http://jp.autoblog.com/2013/03/03/nostalgic-2days-2481km-r32-skyline-gt-r/
We all know that by the time of the R33, airbags were becoming mandatory.  Hence the Series 1 BCNR33 had that monstrosity of a steering wheel taken from the Nissan parts bin.  It did not even have the sporty red stitching found on the more compact steering wheel found on the Series 2 and 3:

Series 1 on left, Series 2 and 3 on right
I guess it could have been worse? The R33 GT-R Prototype's steering wheel:
Actually, this looks better - at least smaller - than the Series 1 one.
All three photos above from: http://www.gtr-world.com/
What is NOT known is that it turns out the second steering wheel (for Series 2 and 3) was actually finished as a product and ready to go by the launch of the R33, but for parts sharing purposes, the decision was made to use the older one that ended up in the Series 1.

So, apologies to Series 1 owners, looks like you guys got stuck with some of the cost cutting going on at the time...

The Gauges:

When designing the R33 GT-R, Nissan designers followed the theme of "road going racer" - so racing drivers as well as Nissan test drivers were asked for the input in designing the interior. One trait as a result was the large number of gauges.

The sub meters were carried over, but improved upon the ones in the R32. On the R32, the gauges were pointed at the driver, but on the R33, in addition to having larger and more readable font, the fascia was cut to allow easy visibility without having to offset the gauges.

OEM R32 GT-R Sub Gauges
From: http://www.gtr-world.com/gt-r/bcnr33/bcnr33-skyline-gtr-4door-autech.html

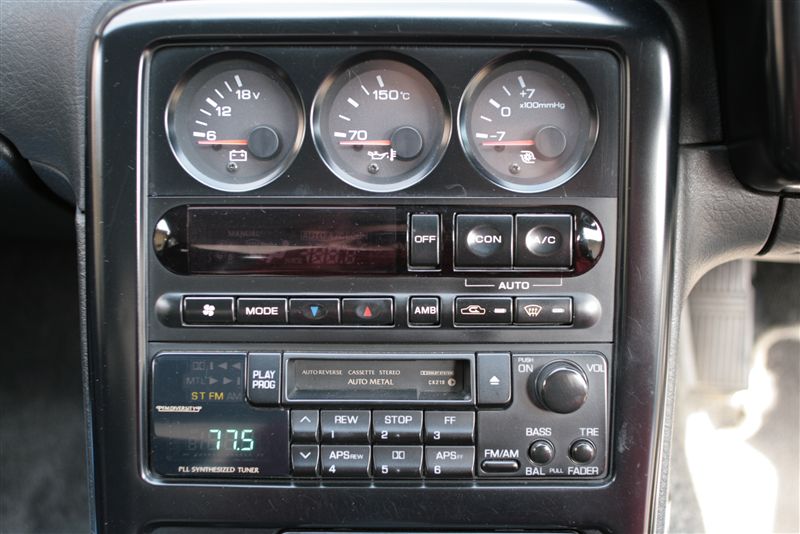
And all the gauges are all ROUND.  Actually, other parts of the interior are round too, including the clock, harzard, defogger and even the HVAC switches.  This was done on purpose, to create a link to the afterburner tail lamps.  As one designer stated,  "The beautiful circle is the Skyline philosophy."

As for the main gauges, one small detail is the use of the imprinted carbon which in addition to the GT-R logo in the tachometer, was designed to separate the R33 GT-R from non GT-R variants.

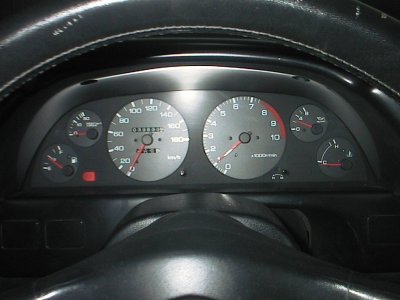
Speaking of the tachometer - unlike in the R32, where the needles of both the speedometer and the tachometer were sitting, at rest, at the 7pm position (see photo above for the steering wheel) or the non GT-R R33, where the speedometer and tachometer needles both begin in the horizontal position -  Why, in the R33 GT-R why does the speedometer needle point to 9pm but the tachometer needle point straight down? I've always wondered about this.

From: http://www.skyline-forum.de/showthread.php/10001-NISMO-R33-320kmh-11k-TACHO

The problem with gauges with needles in the horizontal position (as was found in non GT-R R33 variants) is that the area where the rev limiter would kicks in (at 8000 rpm) is towards the bottom:
Yes, it has the carbon look, but this is a BCNR33 gauge panel installed in an ECR33.
From: http://minkara.carview.co.jp/en/userid/660687/car/1417373/6174645/parts.aspx
For the R33 GT-R designers, functionality was the most important aspect. But they also wanted an emotional connection with the engine as well: they wanted the driver to get excited watching the needle go up and down along with the engine revs.  In other words, the designers wanted the tachometer to have a natural, wide angle of sweep, so the needle would rise from zero at maximum bottom below and peak near the red zone at the very top.   Also, more practically, when driving at high speed, by having 7000rpm at the top center, it was easy to see at a glance that you were approaching the 8000 rpm red zone.

The designers also did a couple other things to emphasize the importance of the tachometer. First, they eliminated the voltage gauge found in the R32, and replaced it with a warning light, and then moved the torque meter to the 3 sub meters in the center stack area.  By eliminating the number of surrounding gauges from 4 to 3 (leaving only one on the tacho side), this made the tachometer appear larger and easier to see.  Also - it turns out that the color of the font on the gauges is actually not white, but a light grey for better visibility.

Compare:
From: http://www.skyliner32.net/HNR32/img/after.jpg

OR:
From: http://minkara.carview.co.jp/en/userid/1558931/car/1155628/4692855/parts.aspx

Amazing the little details they thought about, eh?

Next: R33 GT-R Design Triva, Part 3: Wheels and Tires.