Showing posts with label cabinets. Show all posts

Tuesday, December 20, 2022

Nice End of Year Present! Thank You Very Much!

 So I was pleasantly surprised to receive this today. Fairly light but it WAS from Trust Kikaku...


Wow! Somethiing from HKS! Wait, it says Door Mat?

And it came with instructions! Says that HKS are not responsible for any mods made to this product!

As you can see here, it is much thicker than the cheapo Ikea carpets I have been using. And a non-slip backing too!


Looks fantastic!
And yes, the electric heater is so my legs stay warm while I tinker...

So to my friends who sent this to me - thank you very much! A very nice way to finish off 2022, let us hope that 2023 is a better year, I am sure it will likely be!

Sunday, July 31, 2022

New Japanese Tools for the Marine Day Tinkering

So for years I have done my tinkering with relatively cheap tools - some not so bad ones like an old Craftsman standard/metric socket set I "borrowed" from my dad, but others from a random assortment of tools that I collected over the years - basically I would buy something when I needed it, without thinking much beyond that.

With the COVID-19 pandemic, however, that all changed.  I realized that now was the perfect time for me to build up my tools to high quality ones.  Working for Nissan, I also wanted to make sure that everything I bought was Made in Japan as well - hey gotta support Japan industry. If not Made in Japan, then at least a Japanese brand.  After all, both my cars are Japanese, so I figured why not get tools that match?

So over the past few months I have been doing my research and collecting when I can, certain tools.  A couple of these popped up on this blog previously. 

But only recently did I decide to go all out. For example, I discovered that Kyoto Tool Company ("KTC") specializes or at least is known for automotive repair related tools.  KTC is Japan's most popular brand and because I like supporting the underdog I wasn't automatically going to buy anything KTC so I did a lot of research.

But then I discovered that KTC and Nissan have a long standing relationship - KTC still makes tool kits for Nissan, for example, and in the past even supplied its Mirror Polish (now their super premium NEPROS brand) tools in Infiniti tool kits! 

In fact right now NEPROS are providing this tool kit for Nissan's Autech brand:
From https://ajcollection.theshop.jp/items/56720955

Anyway, this lead me to purchase a nice rolling tool cabinet - KTC offers several models but this is the only one fully Made in Japan.  It comes in silver, black, white or red so of course I got silver to match my car and the garage cabinets.

From https://ktc.jp/catalog/index-category/category-list/ekw-1005__1005bk

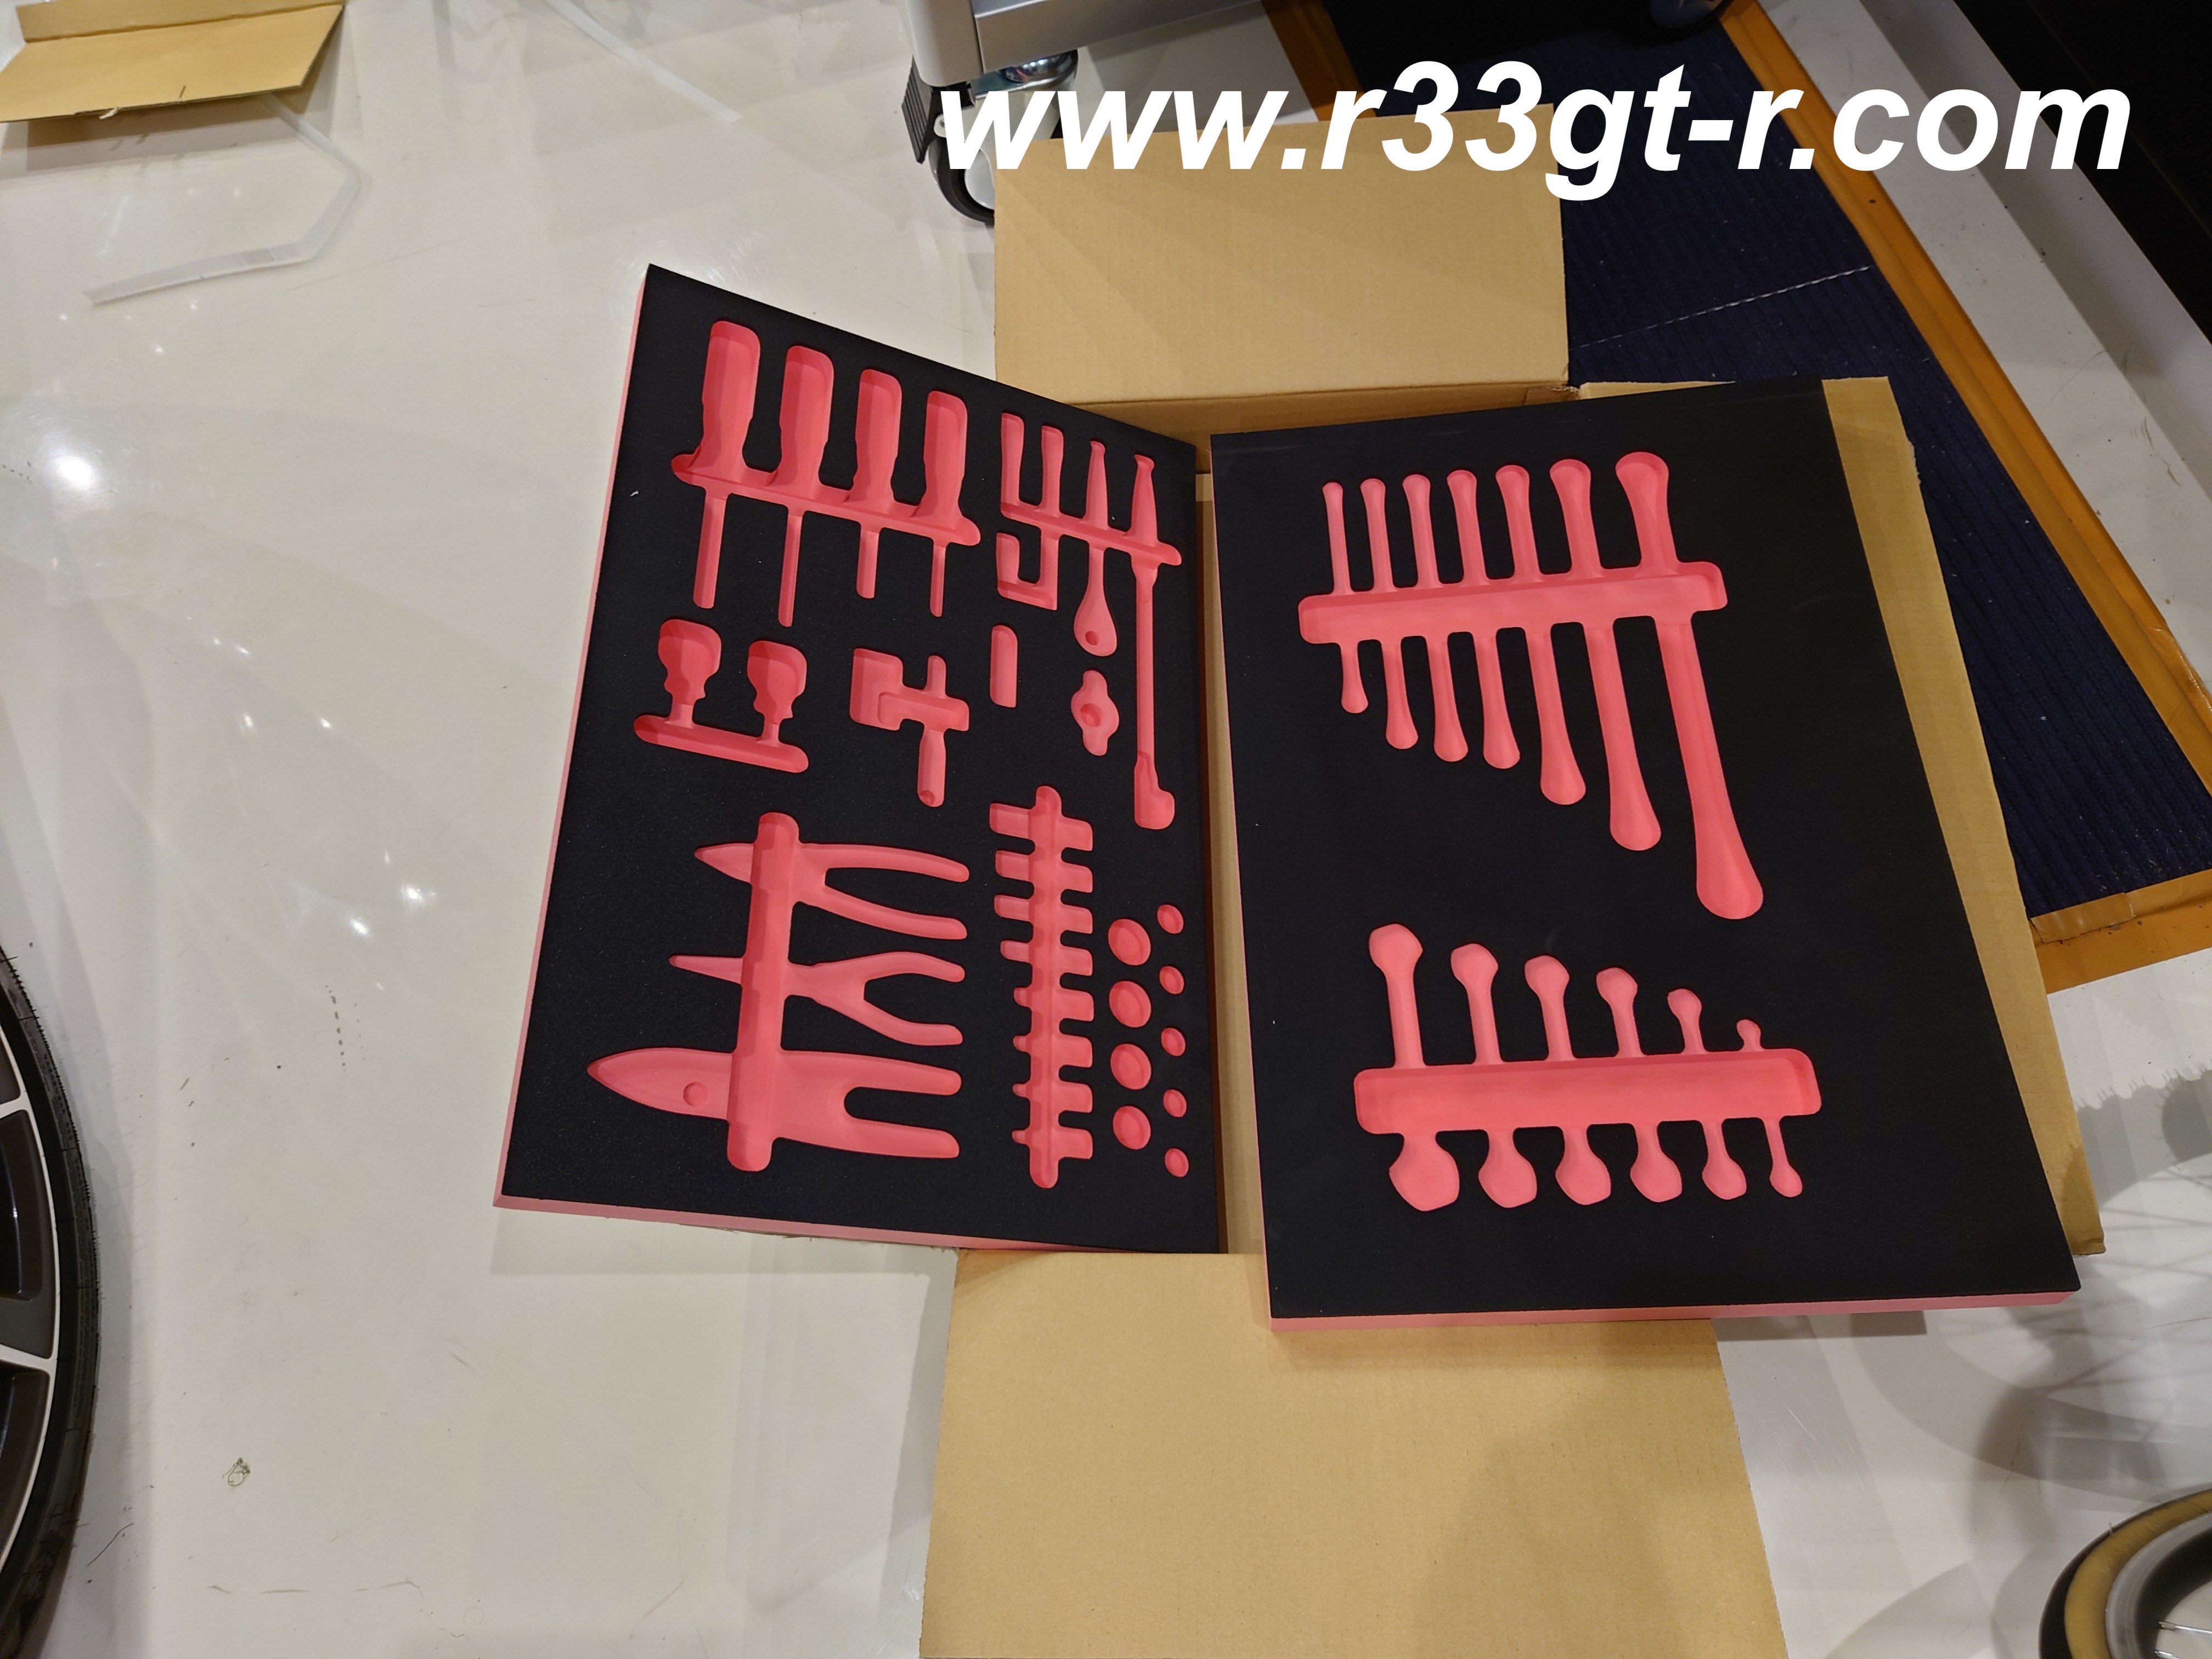
I also got the tool inserts designed for this tool cabinet - yes perfect for my OCD but in actuality really useful as it was easy to grab the right tool quickly, and also it made cleaning up so much more efficient too.
And yes perfect for my OCD...

However despite the cut outs for the KTC sockets and KTC socket wrench, you will note that even though I ended up filling up the socket holes with regular KTC sockets, I still went with another Japanese brand for more specialist sockets (not shown here) and a superlative socket wrench, Ko-Ken. 

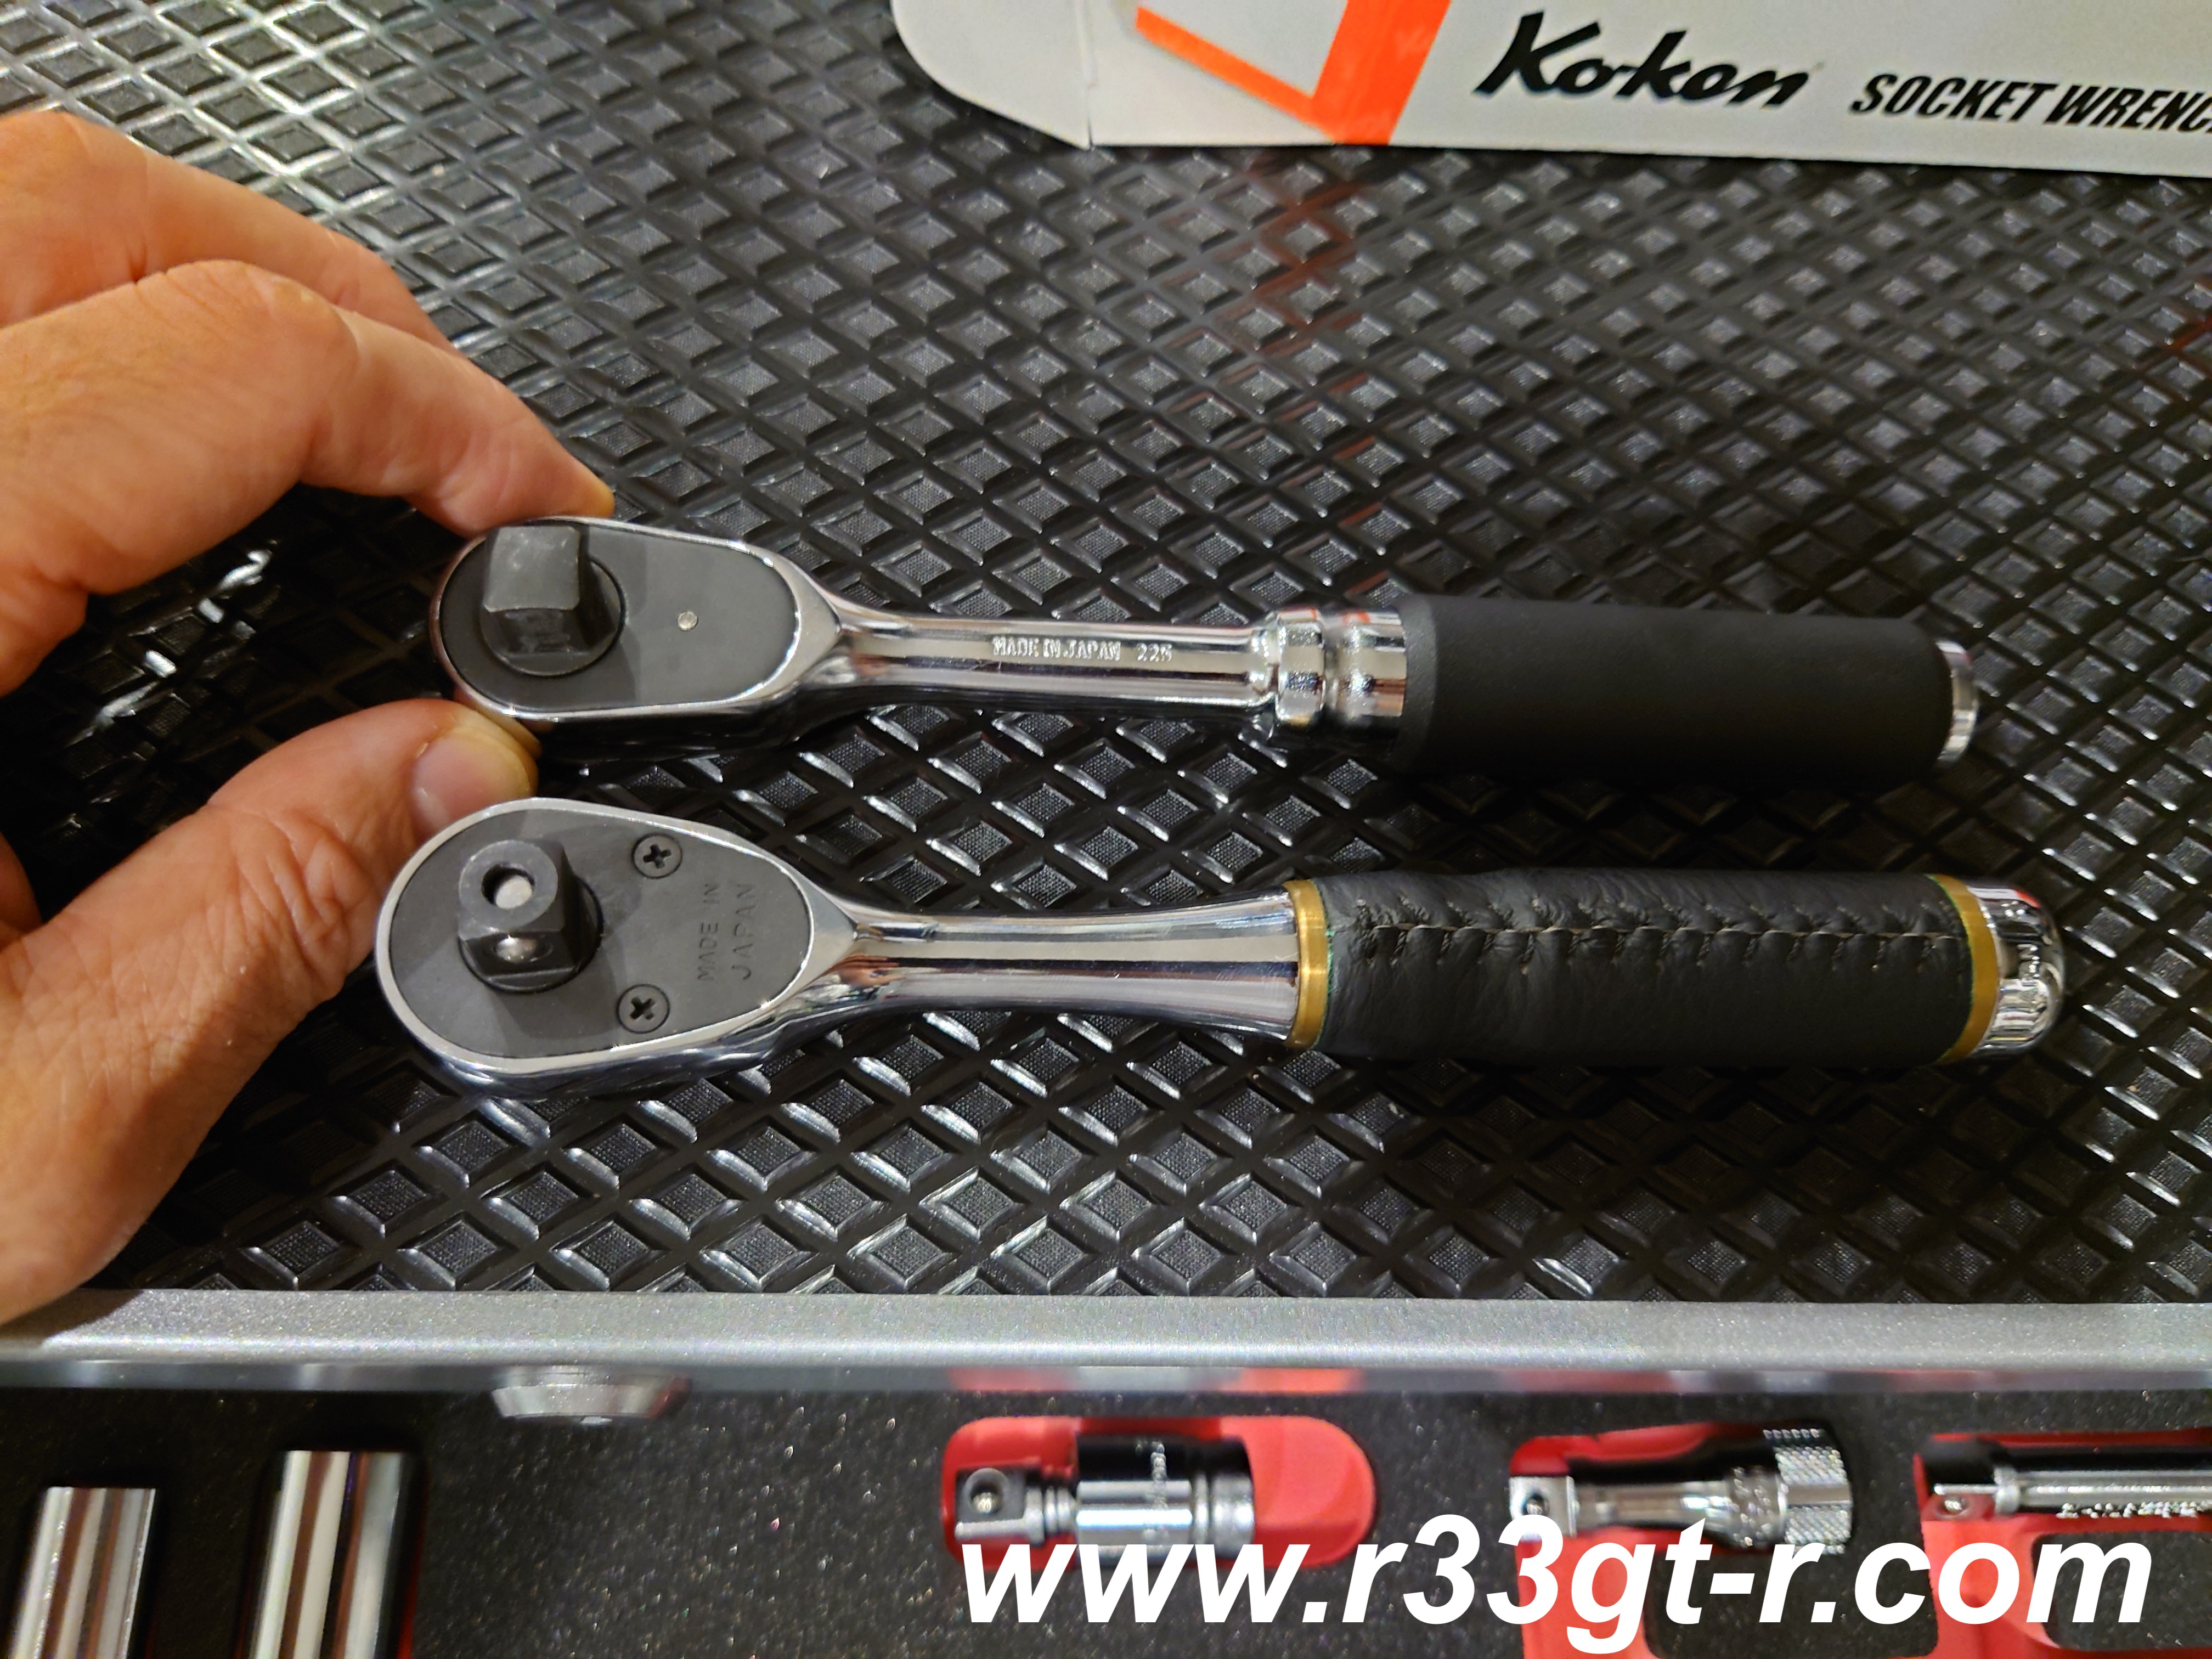
Check out the difference between a KTC NEPROS 3/8inch socket wrench (bottom) and the Ko-Ken ZEAL 3/8 socket wrench (top).

Yep, the NEPROS wrench has a leather wrapped handle!


This company's wrenches are definitely superior to even the NEPROS socket wrench in terms of feel, balance and the ratchet resistance. With such light resistance, it really makes it easy to spin it by hand as well as return the wrench to the initial position.  The additional spinner wheel helps, as well as the cross hatch pattern on the extension bars, which Koken offers but KTC did not.

Note the cross hatch patterns on the socket extensions 

So everything other than what is circled is KTC

While I did order a set of KTC screwdrivers that fit nicely into the cutouts (and I had previously picked up the set of 3 KTC wrenches on sale), I still continue to rely heavily on this lifesaver, a rechargeable motorized screwdriver by Vessell, acknowledged as the premier screwdriver specialist in Japan. By using the motorized feature, much less tiring than spinning a screwdriver by hand, although of course for delicate work you can simply use as a regular screwdriver.  With the built in LED light, this kind of tool is particularly useful for doing work in dark places like the underside of the steering wheel.


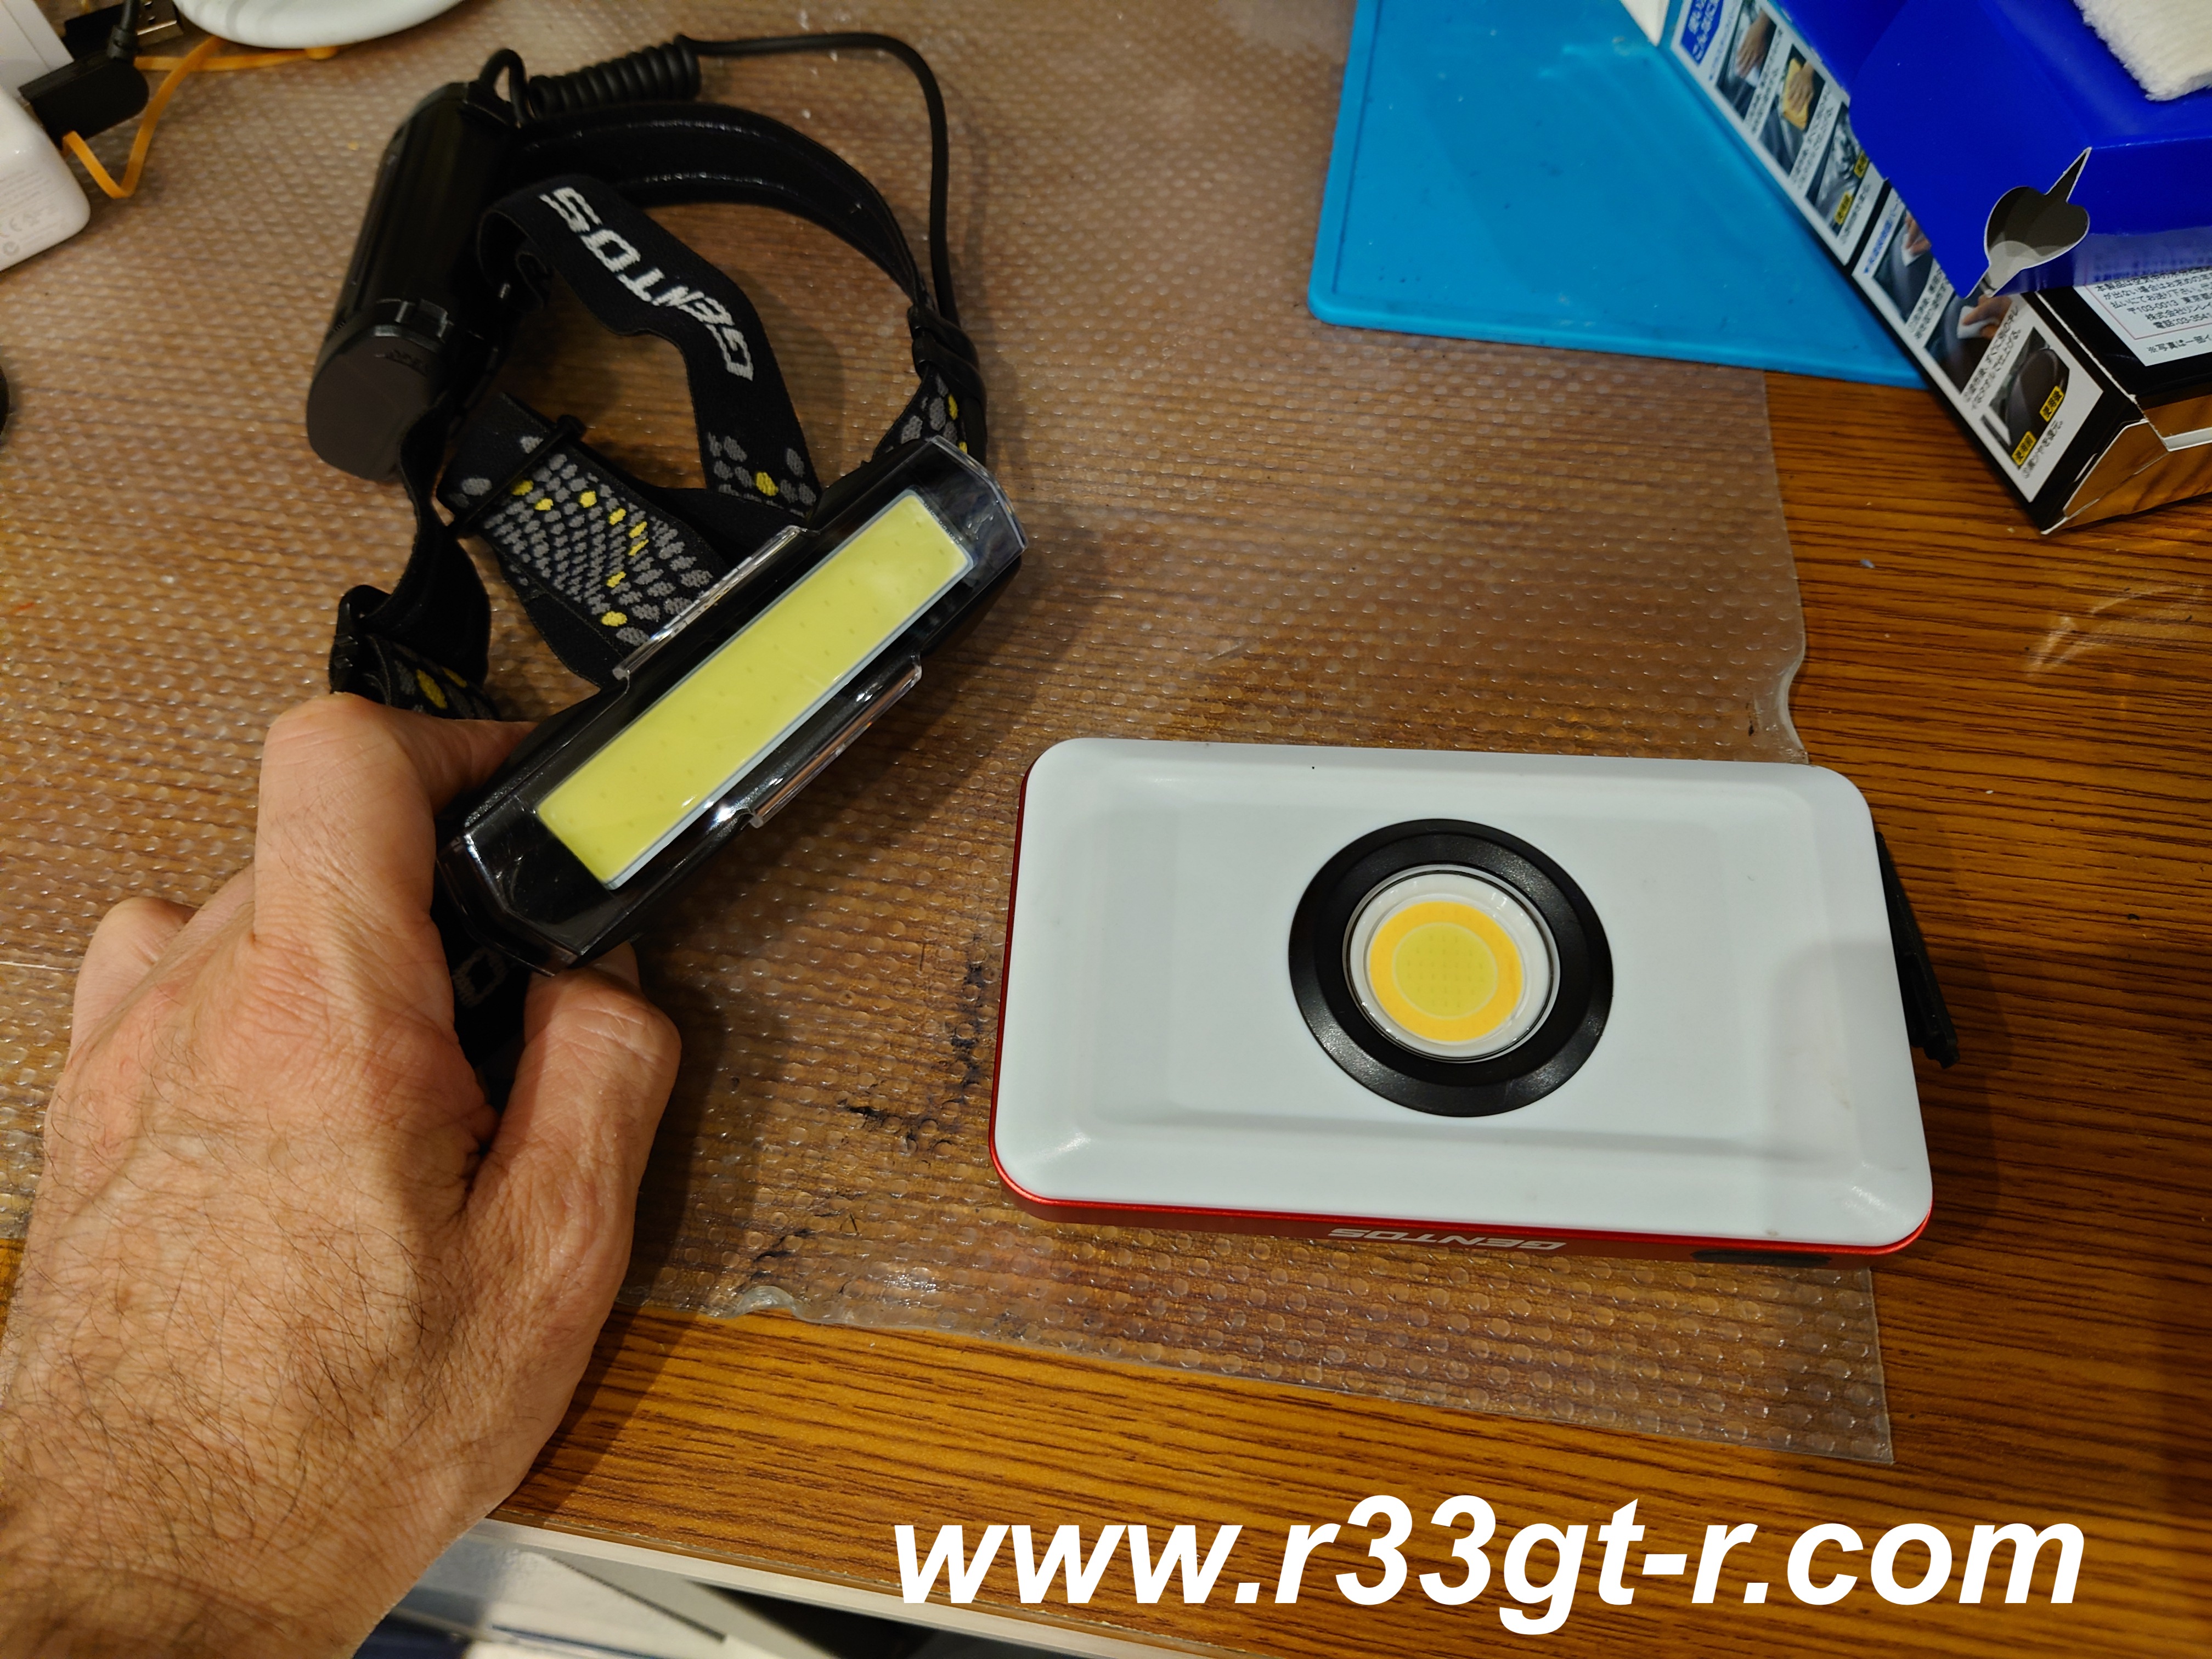
Talking about dark places and lighting - I relied heavily on this LED headband as well as this magnetized COB LED work light by GENTOS - 1100 lumens, and a 10,000 mAh battery which lasts for 12 hours (if not more) easily on one charge.  Proper lighting is KEY when working under the dash.


But perhaps the SUPERSTAR of my recent project on Marine Day is this tool - can anyone guess what this does?

Merry HS175C Coupling Tool by Muromoto Tekko - btw I paid less than half retail on Amazon...

That's right it is a special tool designed specifically to quickly and easily remove those very annoying multi-pin automotive electrical connectors.  Made by Muromoto Tekko as part of their automotive speciality tools lineup and of course Made In Japan.  In the past, I had always struggled with those white electrical connectors - for example those that connect the power window switches to the main harness, or all those that connect the buttons on the main surround to the harness behind it.  Using this means my fingernails are no longer cracked, fingers are no longer sore, and since the tool makes disconnecting the connectors easy, it helps prevent damage to whatever interior piece that needs removal. Especially true as those plastics have all hardened with age and so require more force to disconnect than might be expected. 

I found this graphic which makes it easier to understand what I am saying...
Please check out the website where I found this graphic - tremendously helpful! Plus videos too!

In the same way, I also used this other tool a couple times for smaller connectors - it slips onto your thumb and gives you a built in plastic tip that you can press down on those small little disconnect tabs on the couplers.

It's called the Amon 2381 Music Project Harness Coupler Remover

So here is the rolling tool cabinet in action. Maybe in a future post I can show you how it arrived and how I had to unpack and put the wheels and side handle on, but in a word, it was super heavy! 74kg empty!!
Not sure about sticker tuning, frankly. Although I am tempted as I now have a large canvas for all those stickers I've collected from the parts I've installed on the GT-R.

There were several other tools I found and purchased in order to round out what I might need - except they were not need this time round. Like this 1/4 inch ratchet and socket set from Ko-Ken. Same super smooth low resistance ratchet as the 3/8 size.  And yes I do have the Ko-Ken Nut Grip Sockets, separate from this set and in both 1/4 and 3/8 sizes.


Not sure when I will be able to start really using these tools, but I feel pretty prepared for just about anything now, short of an engine or transmission removal!

Ok next post - back to more car stuff. Stay tuned and thanks for letting me talk about these tools. 

Saturday, August 29, 2020

Cabinets for the Garage (Garage Series)

So after I installed the slatwall, things were looking better. But yeah, things were still not as organized as they could be. Plus, I really wanted a workbench of some sort for small projects.  So again it was Alibaba to the rescue, and I was able to order a full set of garage cabinets directly from the Chinese factory, for a very low cost (a fraction if I bought from the USA, or any other country).  And again, similar to what I had encountered when researching slatwall, the closest I could get to garage cabinet sellers here in Japan were cabinets for clothing (locker room cabinets) or super industrial looking ones which were not only expensive (I am sure well made) but not in the color I wanted nor of the dimensions that would fit nicely in the garage.

So after placing my order, my garage looked like this:

But when the factory told me that the cabinets had arrived in Japan and were ready to be shipped out of customs and directly to me, I hustled and cleaned up the areas where I wanted to have the cabinets.

First was this area along the shorter wall:

As well as this area in front of my first floor office:
BEFORE
I figured this could work as a space for a bench. Maybe with some cabinets.
AFTER
So you can see I was already experimenting with the slatwall accessories (I eventually decided not to hang any bicycles here).

And then lo and behold, TWO 2-ton trucks arrived and unloaded a bunch of boxes. Here are photos of the ones they kindly placed INSIDE the garage....

And then luckily my buddy Dino came over to help me unwrap/unbox everything.  He actually enjoyed using my hammer to yank out countless nails as he dismantled the wooden framing. He said it was therapeutic!
Showing off his nail extraction technique
After we unpacked everything, the cabinets were preassembled, so it was all about lining it all up, then making small adjustments to make sure it all looked good.
Here I am wrapping the steel leg pieces with soft tape to prevent scratches on the floor...
After the main cabinets were set up, then it was time to set up the work bench. It has a nice back board plus overhead cabinets, which required some assembly.
I'm smaller so I of course squeezed back to screw the cabinets onto the frame. Dino is holding it all up with his fingers
And the final result of the workbench:
Later I got the lighting to work and added some items to the pegboard.
The tall cabinets lined up nicely along the shorter wall behind the door.
Still alot of work to be done, check out that mess on the right.
And then basically put all of my cleaning/detailing items into the cabinets... it's still a work in progress, but from left to right, it's 1) cleaning materials, 2) drying items, 3) polishing items, and 4) other stuff such as spare parts, lubricants, paints, etc.

With the smaller cabinets taking up space in the garage where I would normally park (and leaving my vehicles outside!), I decided to hurry up and finish adding slatwall on TOP of these tall cabinets, and then hauled up the smaller cabinets for even more storage space. Of course, I bolted them to the ALC walls and also used those anti-earthquake poles that fit between furniture and the ceiling. 

And the workbench now? Well as you can see I currently have several projects underway...

But indeed it's very nice having a bench and tool cabinets to store all of the small stuff one accumulates over the years, in a somewhat organized fashion.

And yes, this mess is anti-thema to my OCD, so it will get cleaned up... eventually! Anyone have any suggestions?

I DO still have other garage stuff planned for the future, but right now I'm happy with this set up.  I also have a lot of stuff to get rid of as well, because for far too long I've been accumulating various parts and materials so I'm gradually unloading them as we speak. Either trash or Yahoo Auctions or send to people who want/need it (maybe I should have a list somewhere?)

Next post - back to the car's interior! Stay tuned, post coming soon!

Wednesday, August 26, 2020

New Slatwall for the Garage (Garage Series)

Before I continue talking about the fixes I am being forced to make to bring the car's interior back to OEM, sharp eyed readers might notice that my garage is much more weekend mechanic friendly than before.  Let me get you guys all caught up with what I've been doing this year.

Beginning with my first post of 2020 and continuing with all the posts marked as "(Garage Series)," I've shown how I have slowly made improvements to the most important room in the new house, the garage!

As a recap, I first had to get the garage floor redone to remove an incline, then had the floor covered in an epoxy coating, then I got a shed for storage overflow, and then finally got an industrial grade sink as well as a Braava floor cleaning robot.

But maximizing garage storage space and keeping things better organized are what I wanted to improve, and I also wanted a work bench in order to have a safe place to do smaller projects.  And of course, looking good is important as well. This means being organized is key - up until now, all of my tools and supplies have been scattered about in various boxes and metal racks, and frankly it's not the most efficient nor comfortable way to do things.

So, first order of business was to utilize the wall space - this garage is large, with a ceiling height of about 3.4 meters.  That means the walls SHOULD be utilized to hang items, and the easiest and cleanest looking way, from what I have seen, is to use slatwall (think vertical!).

The problem for me was that literally no one apparently sells slatwall in Japan (I found companies selling the hooks and shelves for slatwall, but NOT the slatwall itself... weird).  I looked at companies in the USA, but in the end I found that pricing and customer service was the best out of China! (call me un-American, but when American companies are getting their stuff made in China...why not buy direct? Alibaba really makes things easier).

So I made some rough estimates as to the quantity I needed, and a few weeks later:
Guy had to get the dolly out!
Yeah, they look like a drug shipment. Very suspicious!
Contents were these interlocking slatwall pieces


As well as the accessories such as a magnetic tool rack and various hooks and shelves
So the trick here is - see the wall behind the slats? That's made of "ALC" or Aerated Lightweight Concrete.  This requires special bolts to be used to attach things to the wall.  You can see that although I cut out (using a jigsaw) enough space for the faucet and the electrical outlets, the bottom slatwall piece is using 4 massive ALC specific bolts to anchor itself and the top piece.


But once that first piece is in place, it's really just a matter of stacking additional pieces onto (the bottom and top of each are designed to interlock) each other.


 And once this side of the garage was done, then it was time to attach this odd corner


You will note that there are joint pieces that join, at 90 degree angles, the slatwall pieces. So I used some PVC cement and created the angle.  And then it was just a matter of screwing the panels into the wall and then stacking up (and screwing in) additional panels on top.

This corner was tough. You can see I had to get the level (dark blue, bottom right corner) out to make sure that both sides were absolutely level with the floor as well as with each other.
And the completed (kind of) result? Well this is looking much cleaner and utilitarian, but there is still too much clutter. I also haven't used all the hooks and shelves I was sent.


To take care of the rest of this clutter, I needed cabinets... and that was another crazy adventure which I'll talk about in my next post (and featuring a minor celebrity who came over to help...)

Sunday, April 12, 2020

So as We are All Stuck Inside These Days... (Garage Series)

So with COVID-19 wreaking havoc on the world, I think most of us are stuck (mostly) inside or working at home during most hours of the day. Hopefully none of you (or your family) are adversely affected by this pandemic.

Normally, I would welcome being at home (so long as I am healthy) as I can sneak off in my free time to the garage to work on the car, but right now, having just brought the car back from NISMO, AND how we are STILL unpacking from our move into the new house, the only thing I can do is to continuing organizing my new space. Still can't find all of my tools and car cleaning stuff...

First order of business was to find a place to store parts, both old and new, which I probably won't be using in the near future. The garage is still a work in progress, and I plan to order some cabinets to place along the wall here:
And yes there is a sink with hot and cold taps there too... he he he 
As you can see right now, I'm using some of my old racks to hold mostly car cleaning related equipment in this area.  Some equipment is still missing, most likely still at my mother-in-law's house where we kept non-essentials while this house was being built (and as I had no space at my temporary rental house).

Given my limited budget and how garage cabinets aren't really sold in Japan, I am thinking about ordering something from Alibaba. Can anyone recommend any decent quality garage cabinets/garage cabinet makers? More importantly for my Italian (and other color coordinated talented) friends, COLOR? What COLOR?

So that's for storage. What about a proper work bench?
Damn fish (bought for the kids who now don't care) won't die...

Over here in a corner area, I have just enough space right now to set up an old aluminum rolling cart from IKEA as a mobile work bench of sorts.  All of my hand tools are currently on the tray, and yes that is a fish tank... there are two cory catfish that refuse to die, all the other residents have long passed away but I'm not into pesca-cide just for the sake of clearing space. And so the tank stays until  I get a proper work bench here and then I will come up with an alternative plan.

Anyway - so I have a bunch of old parts taken off both cars, as well as new parts never installed. Eventually if I get the cabinets, yes there will be space between the cabinets and ceiling so some stuff can be stored in that space. Meanwhile...

I did some research and found these DIY assembly storage sheds from Takubo Mono-oki. Just like IKEA, except it's much more solidly built.

So it arrived in several boxes, forgot to take photos but basically after laying the floor piece and making sure it's flat, you build the walls up, then the roof on top. Pretty straightforward but not fun as a one man job (especially when the walls are over 2 meters tall and it's a windy day).
 People usually place these sheds on blocks that themselves are on flat land. I had to get creative due to limited space.
So the rear sits on 3 blocks, but the front side rests nicely on this low wall.

This really isn't a one man job but somehow I managed
I chose the 3/4 shelves style unit as I wanted to be able to vertically store long items
Yep, the oem sideskirts and rear sfrom my car

I have to say the paint quality on this shed (for this price) is impressive.
Made In Japan...
Anyway, now that this lockable shed is up and is now storing a lot of car related parts I won't be needing in the foreseeable future, I need to turn my attention to getting the interior of the garage improved... and at the same time quietly gathering the parts I will need to continue fixing the interior of the GT-R. Stay tuned!
It's almost like owning an EV...

Wednesday, March 18, 2020

Finishing the Garage Floor! (Garage Series)

Epoxy floor coatings for personal garages aren't a popular thing in Japan, so it took me a while to find the right company. Luckily, Google WAS able to find a specialist that seemed to be exactly what I wanted, Hikari Coating.

First, Nagai-san, the owner of the business, came over in early February, right after the repairs to flatten the floor were made, and we discussed exactly what I wanted. He also provided an estimate and I was pleasantly surprised at how reasonable it was.  So I immediately made a reservation to get the work done in early March.

Even though the weather wasn't cooperating, Nagai-san and his crew from Hikari showed up as promised on Sunday morning to begin preparing the floor of the garage for the epoxy coating.


After some discussion, I had elected to go with a high gloss white epoxy coating for the garage floor, and a grey anti-slip coating for the parking spot/driveway outside the shutter door.  Nagai-san had actually recommended I go with a light grey for the inside because, as he put it, white has a tendency to show dirt very easily and in some circumstances can yellow if exposed to too much sunlight. However, I decided to go ahead and stick with the original plan of gloss white - I'll just keep the garage door closed as much as possible!

The first step was to prepare the cement floor. In order to prevent future peeling, the crew ended up removing the foam cushioning that the house manufacturer had installed between the flat concrete floor slates and the walls of the garage, replacing the foam with an elastic putty like material.
You can see the grey putty they used
That was all they had time for the first day.

The second day, a single guy showed up - but he went ahead and prepared the floor of the garage by way of some polishing and then application of primer.
The polish machine. You can see the dust on the floor.
Looks very ugly. I was surprised

This primer dried pretty quickly, and before he left, he had gone ahead and spread out the middle coat of white epoxy.

He had also gone ahead and prepped a few cm that extended past where the shutter door came down on the ground.
From the outside. Wasn't quite sure what to make of this actually
The next day was rainy as well but out of the elements the inside floor dried very well, except I (being OCD) of course noticed some slight grey areas peeking through the epoxy.
Hard to tell but there are vague grey patches in the white floor
Some more grey patches can be seen here too

Concerned, I emailed Nagai-san who told me don't worry, he wasn't done yet and and when the top coat would be applied the next day, it wouldn't be visible.

And indeed the next day was very sunny, and even though I had to be at work I watched via my security cameras as the crew finished up the inside of the garage by application of the top coat, which then extended past the floors and up 45 cm to the bottom of the cement walls.
Was grey before - see the previous photos.
At the same time, the crew was cleaning, then laying primer on the outside parking spot/driveway.  By the time I checked the cameras at 5pm, they were done with applying a grey epoxy coat, and by the next morning it looked like this.
But not quite done yet - see how shiny the grey is?
On the third day of work, the workers added the grey top coat and added some sand, to make for an anti-slip surface. They also touched up the interior where some dust/bugs had inevitably ended up in the paint. Then left it to all dry overnight.
Looks like a sneaker to me...
Unfortunately, overnight some a-hole had decided to purposely step into the wet paint. His foot prints extended from the middle of the driveway all the way to in front of the front stairs to the house.

But when the worker showed up, he reassured me that he could remove it, and further was going to add a quick drying clear anti-fade top coat.
Look at that masking! Wow!
Now I have to figure out how to correct the other uglies around the house, especially that concrete wall!
And the end result?
From back looking out to the street-side
Wow! I have to say it turned out better than I had expected.
From the front, looking towards the back. Yes, I have a garage door leading into the yard...
This being Japan, it looks good not just from a distance, but also up close. It's the details that make all the difference...
Grey anti-slip, meet white gloss. Check out how crisp that line is.
Look at that precision!
And the grey spots in the upper left are reflections of the EV charger and electrical outlets on the wall!
In conclusion, it looks great! I am very happy. However, my next challenge is to keep the floor as white and clean as long as possible. I will have to get creative - even though I don't plan to keep the shutters open on a frequent basis, if Nagai-san is correct about yellowing from exposure to the sun, then I need to lay some protective carpeting or tiles or something in areas where the sun hits the most.

But now that it's dry - it also means I can finally start moving things into the garage from storage areas throughout the house, and can start planning on garage fixtures such as cabinets and tool chests.  But first, maybe I should go pick up my GT-R and see how it looks in the new garage...